The other day I got an email from a hockey dad that had just downloaded and started diving into Breakaway Hockey Speed, and immediately had some questions. Based on what he told me, he has two sons that have completely different skating styles (which is something I discuss in the manual), and was hoping to get some clarification on “ideal” skating patterns.

He wrote:

Kevin, I signed up for Breakaway Hockey Speed and am reading it now.It’s awesome! It rings very true to me. You don’t look like a very old guy but the observations here would seem to have taken a lot of time or some very careful observation over a number of years.

The reason it rings true to me is that I played hockey all my life and now have two boys ages 12 and 10 who have played since they were old enough to skate. And the two have totally different skating styles.

It’s been a real nature vs. nuture observation for me – they both learned the exact same way and they both did the exact same programs. But they have two very different body types (youngest one lean and flexible, the older more dense with a more limited range of motion) and that certainly seems to have been the biggest difference in their development as hockey players and skaters.

I’ve cut out parts of the message, but his questions and my responses are below:

1) How does one determine their optimal skating depth based on their individual build and joint range of motion (ROM)? Should working on improving ROM be the priority instead of adapting to a sub-optimal situation?

Skating depth based on an individual’s build goes much deeper than muscle flexibility. The contour of the hip joint itself and the length of the femurs relative to the torso will both play a huge role where a player’s optimal body position falls. Longer femurs relative to a shorter torso (this can occur in tall and short people as it’s the ratio, not the absolute lengths that’s important) will necessitate that the player maintains more of a forward torso lean to position his or her center of gravity appropriately above their skates. This will necessitate more hip flexion range of motion, which the individual may or may not have, or will result in a spinal flexion (rounding, particularly of the lower back) which is likely to cause discomfort in this area over time. Allowing this player to skate “higher” than some arbitrary “norm” isn’t allowing them to adapt to a sub-optimal situation, it’s keeping them out of sub-optimal positions altogether. I’m sure these things could all be measured, but that’s really not necessary. You just need to have a good eye for how they move.

In reality, the “ideal” stride is almost the same for everyone: it’s the lowest depth that a player can achieve keeping their hips above their knees,  maintaining a neutral spine with their center of gravity balanced appropriately over the skates. In Ultimate Hockey Training, I’ve included some pictures of extreme situations to help illustrate how “lower” is not always better.
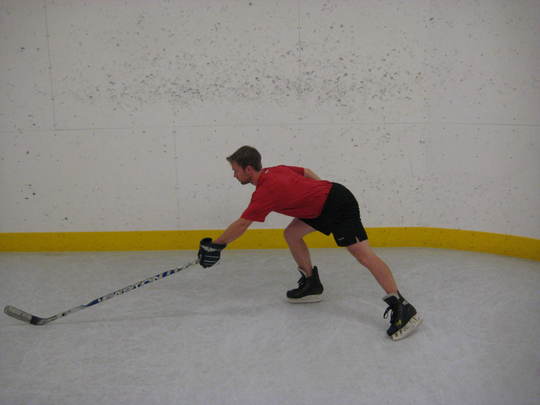
Far Bend Stride

In this picture, the degree of hip flexion (think torso lean) is way too far. Note that I still have a fairly neutral lumbar spine (lower back) in the picture, which is desirable. However, the angle of torso lean is such that it unloads the stride leg, so it’s not possible to produce as much propulsive force off that leg.
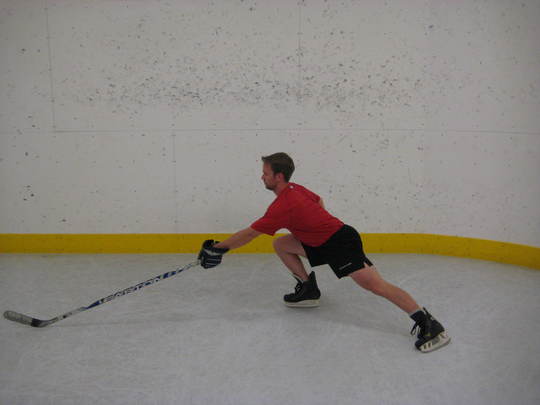
Deep Standing Stride

In this picture, the degree of knee flexion is way too far. This shifts the COG too far behind the lead leg, but the deep bend also makes roughly the first half of the stride very awkward, as it’s essentially just repositioning behind the COG to be able to create propulsive force.
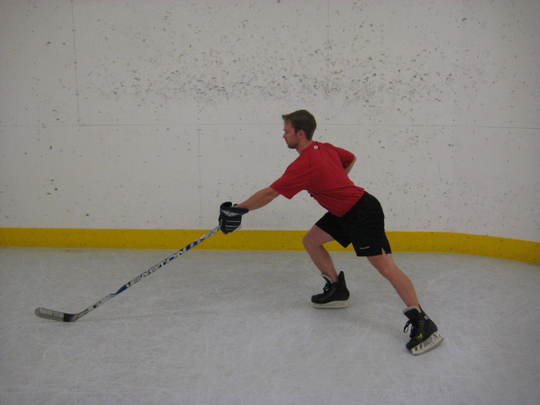
Optimal Stride

In contrast to the firs two pictures, this one is characterized by much more mid-range hip and knee flexion angles. This allows a more optimal positioning of the COG over the front skate, while also positioning the body for a strong propulsive stride. In the picture below, I’ve put the three pictures side-by-side, with a box that encompasses the shoulders and the pelvis to provide a crude illustration of where the bodies weight is positioned. Note that the first box is shifted forward, and the second box shifted backward relative to the more optimal stride position.
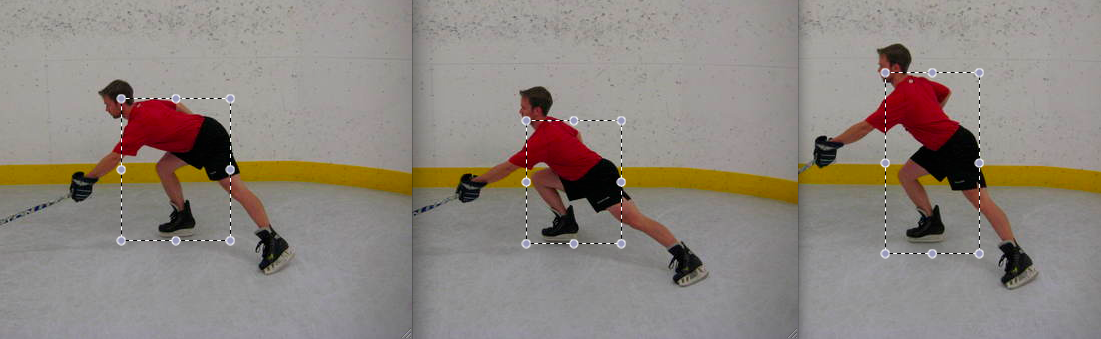
Skating Stride Comparison

With all of that said, the criterion for an optimal position is relatively similar for most skaters, but the outcome will be much different based on individual structural differences. As I noted above, an individual with longer femurs and a shorter torso may look a little more like the first picture in order to keep their weight positioned appropriately. An individual suffering from femoroacetabular impingement will have limited hip flexion ROM (typically around 90 degrees, compared to 120+) and will therefore need to maintain a slightly higher skating position to minimize stress to their anterior-superior hip labrum (the most common site of tears), and their anterior hip capsule. The point here is that optimal will look different for everyone, and it’s important to identify WHAT exactly may be limiting an individual’s ability to skate at a lower depth (if they appear too high, which is the most common complaint). It could be strength, positional awareness,  or structure, all of which are trainable/coachable, but they require very different strategies to address.
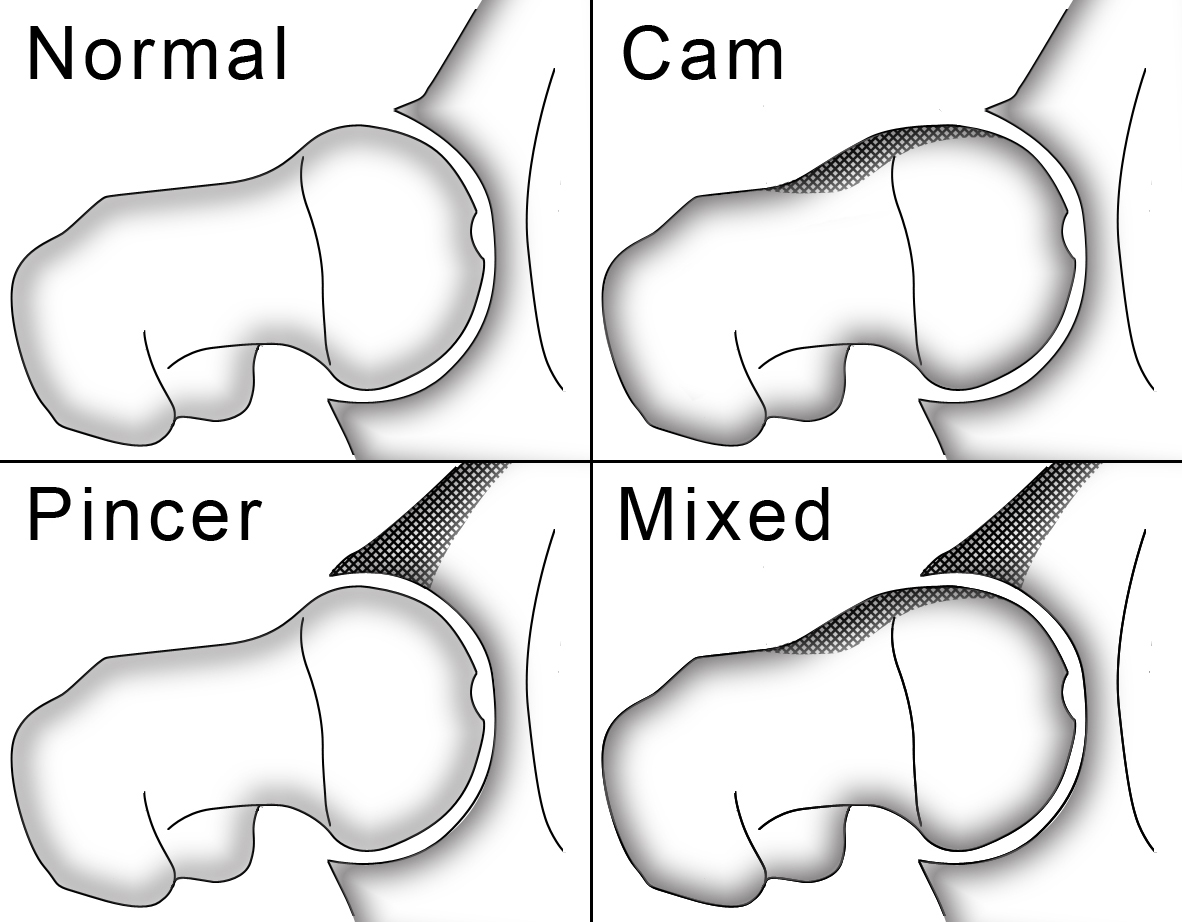
Femoroacetabular Impingement

2) When you say that most skaters with shorter, choppier strides are “naturally tighter”, what does this mean exactly? Is there any point in working with a skater that fits into this category to attempt to develop the flexibility and ROM necessary to have a closer to ideal knee and hip flexion?

This is an observation I’ve noticed from my time as a player and as a strength and conditioning coach. Stiffer players tend to be faster. This is true in almost all sports. They tend to be higher force output individuals, probably because the stiffness allows them to transfer energy and reduce force better. Stiffness, by definition, means it takes more force to displace the joint through any given range of motion; it doesn’t mean they can’t achieve full ROM. Although this is sometimes the case; the key is to know what they need and ensure that every player has that plus a little “wiggle room”. The idea that more flexibility is better is drastically misguided, and stiffness gets a really bad reputation when it probably shouldn’t.

3) You wrote that about 45-degrees is an optimal stride angle. I’ve noticed that for really effortless looking skaters who have green knee bend and hip flexion it sometimes seems like they are pushing almost straight out to the side at times. I know that just doesn’t sound right and I’m sure there’s no way the mechanics can work but maybe there’s a radius / arcing motion at play that makes it look that way. Just curious if you have ever studied that?

The 45-degree angle is optimal simply because of physics; think Newton’s laws. When an individual pushes through the ice, the stride leg is creating the propulsive force and the glide leg is determining the direction the individual will move, within reason. If a players stands with both skates pointing straight ahead, and pushes straight to the side with the right skate, he/she will either: A) Shave ice with their left skate or B) Fall over. This is despite the “glide leg” being oriented straight ahead. The vector that the individual pushes at will strong bias their movement in that same direction. Just as a push straight to the side would push them straight sideways, a push straight back would push them straight forward. This latter scenario would be ideal, but given the contour of the skating blade, they wouldn’t gain any friction. 45 degrees (or some slight variation of it) maximizes the combination of the forward propulsion vector AND skate blade contact.
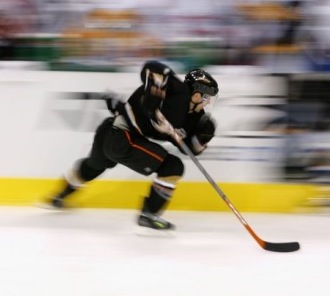
Andy McDonald Skating

That’s a wrap for today. If you haven’t yet downloaded your copy of Breakaway Hockey Speed, you can do so for FREE by entering your name and email in the form below!

To your success,

Kevin Neeld
UltimateHockeyTraining.com

Please enter your first name and email below to sign up for my FREE Athletic Development and Hockey Training Newsletter!
I got another question via email last week about post-activation potentiation (PAP). The writer mentioned he has been familiar with the practice and has benefited from integrating it into his own programs, but hasn’t seen a lot of other coaches use it.

If you’re not familiar, PAP is phenomenon that has implications for both performance in the presence of fatigue and high power/speed contractions.  Essentially, ongoing or repeated stimulus of a neuromuscular pathway (think muscle contraction) results in any number of proposed consequences that prime that pathway for future force production. The proposed mechanisms included increased Ca2+ sensitivity of the involved actin/myosin chains and increased alpha motor neuron excitability. In both cases, the result is an increase in force production for the same “input” signal, although the former is at the muscular level and the latter is at the spinal cord/nervous system level. If you’re interested in reading deeper into this, I highly suggest reading this review article:

Hodgson, M., Docherty, D., & Robbins, D. (2005). Post-activation potentiation: underlying physiology and implications for motor performance. Sports Medicine, 35(7), 585-595.

The most common application of this principle in the strength and conditioning world is to pair a heavy resistance training exercise with a similar patterned explosive movement exercise. A few examples include:

  1. Back Squat or Front Squat paired with a Vertical Jump
  2. Deadlift or Stiff-Legged Deadlift paired with a Broad Jump
  3. Reverse Lunge or RFE Split Squat paired with a Split Squat Jump
  4. Bench Press paired with an Explosive Push-Up
  5. Chin-Up paired with an Overhead Med Ball Slam
  6. Forward Sled Drag paired with a Forward Sprint
  7. Lateral Sled Drag paired with Lateral Start Sprint

These are just a few examples, but hopefully it provides a couple illustrations as to how this principle can be applied. This type of training method is known as “Contrast Training” and has been around for a LONG time. At Endeavor, we’ve used this method in various capacities, including using resisted and unresisted jumps with the Vertimax.

I view it as a method to unlock existing power potential within the nervous system. Naturally then, it’s a method that is appropriate for use within phases that power development is a primary or secondary goal. It’s also an effective method at maintaining maximum strength levels. There are a few important considerations in how this method is implemented:

  1. The intensity of the resistance training load
  2. The volume of the resistance training exercise
  3. The pattern of both the resistance training and power training exercise
  4. The duration of rest between the two

In general, the first two components here are fairly simple. The higher the intensity, the greater the potentiation. Volume should be kept low so as to induce activation, but not fatigue. Naturally a Back Squat performed at 90% 1-RM for 3-4 reps (or whatever is the individual’s max) would not be likely to improve subsequent power performance because the individual would be too fatigued. In contrast, if the individual performed 1-RM with perfect technique and an accelerated concentric phase (moving the weight up quickly), the “prime” for explosive movement would be more optimal with less risk of creating unnecessary fatigue. This view point is largely supported by the degree of time we have in real-world training situations to implement this method. Some research suggests that waiting as long as 8-12 minutes maximizes the benefits of potentiation (Gouvea, A., et al., 2012), whereas others suggest that 4 minutes may be optimal with values returning to baseline by 8 minutes (Lowery, R., et al., 2012). The discrepancies are inevitably in the employed methods and probably reflect longer rest for higher volumes of training. Unfortunately, in most situations it’s not realistic to wait 8 minutes between exercises, so minimizing the “conditioning stimulus” resistance training exercise volume is an effective strategy to capitalize on potentiation in a reasonable time frame.

With regards to to the selected exercises, it’s important to remember that, while there is certainly some carryover, neural activation networks are movement specific. The more directly the conditioning exercise can replicate the subsequent power exercise, the more profound of an impact the potentiation will have. Essentially you want to think of it as overloading a pattern, and then unloading a pattern. In the examples above, you’ll note that a back squat is paired with a vertical jump, but a deadlift is paired with a broad jump. The primary difference between a broad jump and a vertical jump is that there is a greater forward torso lean and  posterior weight shift with a broad jump, which allows the individual to propel themselves forward more than upward. Similarly, a deadlift involves a greater posterior weight shift and more heavily loads the posterior chain compared to a back squat. These differences are slight, but notable.

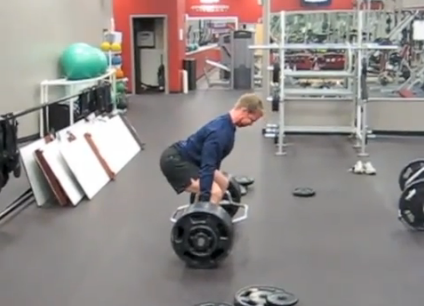
Hockey Training-Trap Bar Deadlift
Trap Bar Deadlift
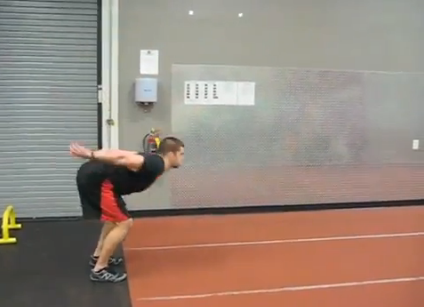
Hockey Training-Broad Jump
Broad Jump
Hopefully this gives you some good ideas on how and when to implement this type of strategy. As with any training method, it’s important to keep the goal in mind so you can program this method into the appropriate phase of a training cycle. This fits very well into an off-season phase where power development is the primary target. It would not fit very well in an in-season environment where the players have a substantial amount of accumulated fatigue (you can’t maximize peak power from a diminished starting point). In contrast, it may fit well into a short in-season training cycle where the players have decreased practice and game loads, are fairly rested, and need to return to some max strength and power work, briefly. I’d also urge you to only use this method with exercises that are EXTREMELY familiar to the athlete. As I’ve said repeatedly in the past, you have to move well before you can move more or move faster. The athlete should be proficient in both the resistance training and power exercises. If you’re interested in more information on PAP, Bret Contreras wrote a great article on the topic a few years ago, which you can find here: Post-Activation Potentiation: Theory and Application

To your success,

Kevin Neeld
UltimateHockeyTraining.com

References:

  1. Gouvea, A., et al. (2012). The effects of rest intervals on jumping performance: A meta-analysis on post-activation potentiation studies. Journal of Sports Science, Nov 9, epub.
  2. Lowery, R., et al. (2012). The effects of potentiating stimuli intensity under varying rest periods on vertical jump performance and power. Journal of Strength and Conditioning Research, 26(12), 3320-3325.

Please enter your first name and email below to sign up for my FREE Athletic Development and Hockey Training Newsletter!
The other day I got a great question from a college intern:

I was helping out with the women’s hockey team several days ago, and they were having them do weighted pushups.  I noticed that most were barely going halfway down on the eccentric portion, and their elbows were flared almost to ninety degrees.  I suggested to their head coach that he drop the weight, as they clearly weren’t able to handle the weight, weren’t getting anything out of it, and were just putting themselves at risk for getting hurt.  He obliged and had them regress to bodyweight, but still a couple of them had trouble with proper form.  I was curious if you could recommend any regressions from BW pushups for younger athletes, inexperienced lifters, or female athletes who just can’t quite handle them.

I really like questions like this because it speaks more to the art of coaching. Also, the question is phrased in a way that demonstrates an understanding that “good” exercises can be performed in ways that make them “bad” exercises. Teaching quality movement is more than just picking good exercises; they need to be performed optimally to really gain the benefit.

Push-ups, because they require no equipment, and therefore are space and large group friendly, tend to be a go-to for youth hockey organizations. I’ve discussed the common flaws in horizontal pushing patterns before, especially as they pertain to shoulder pain. You can check out one article on that topic here: Shoulder Pain with Pressing Exercises

The truth is, most untrained female athletes and almost all youth athletes (especially ~15 and younger) can’t do a good push-up, let alone several sets of them. As a result, we’re constantly regressing the movement in any number of ways dependent upon what the major limitation may be.

The three most notable limitations we see on a regular basis are:

  1. Lack of anti-extension core strength
  2. Lack of scapulothoracic control
  3. Lack of pressing strength

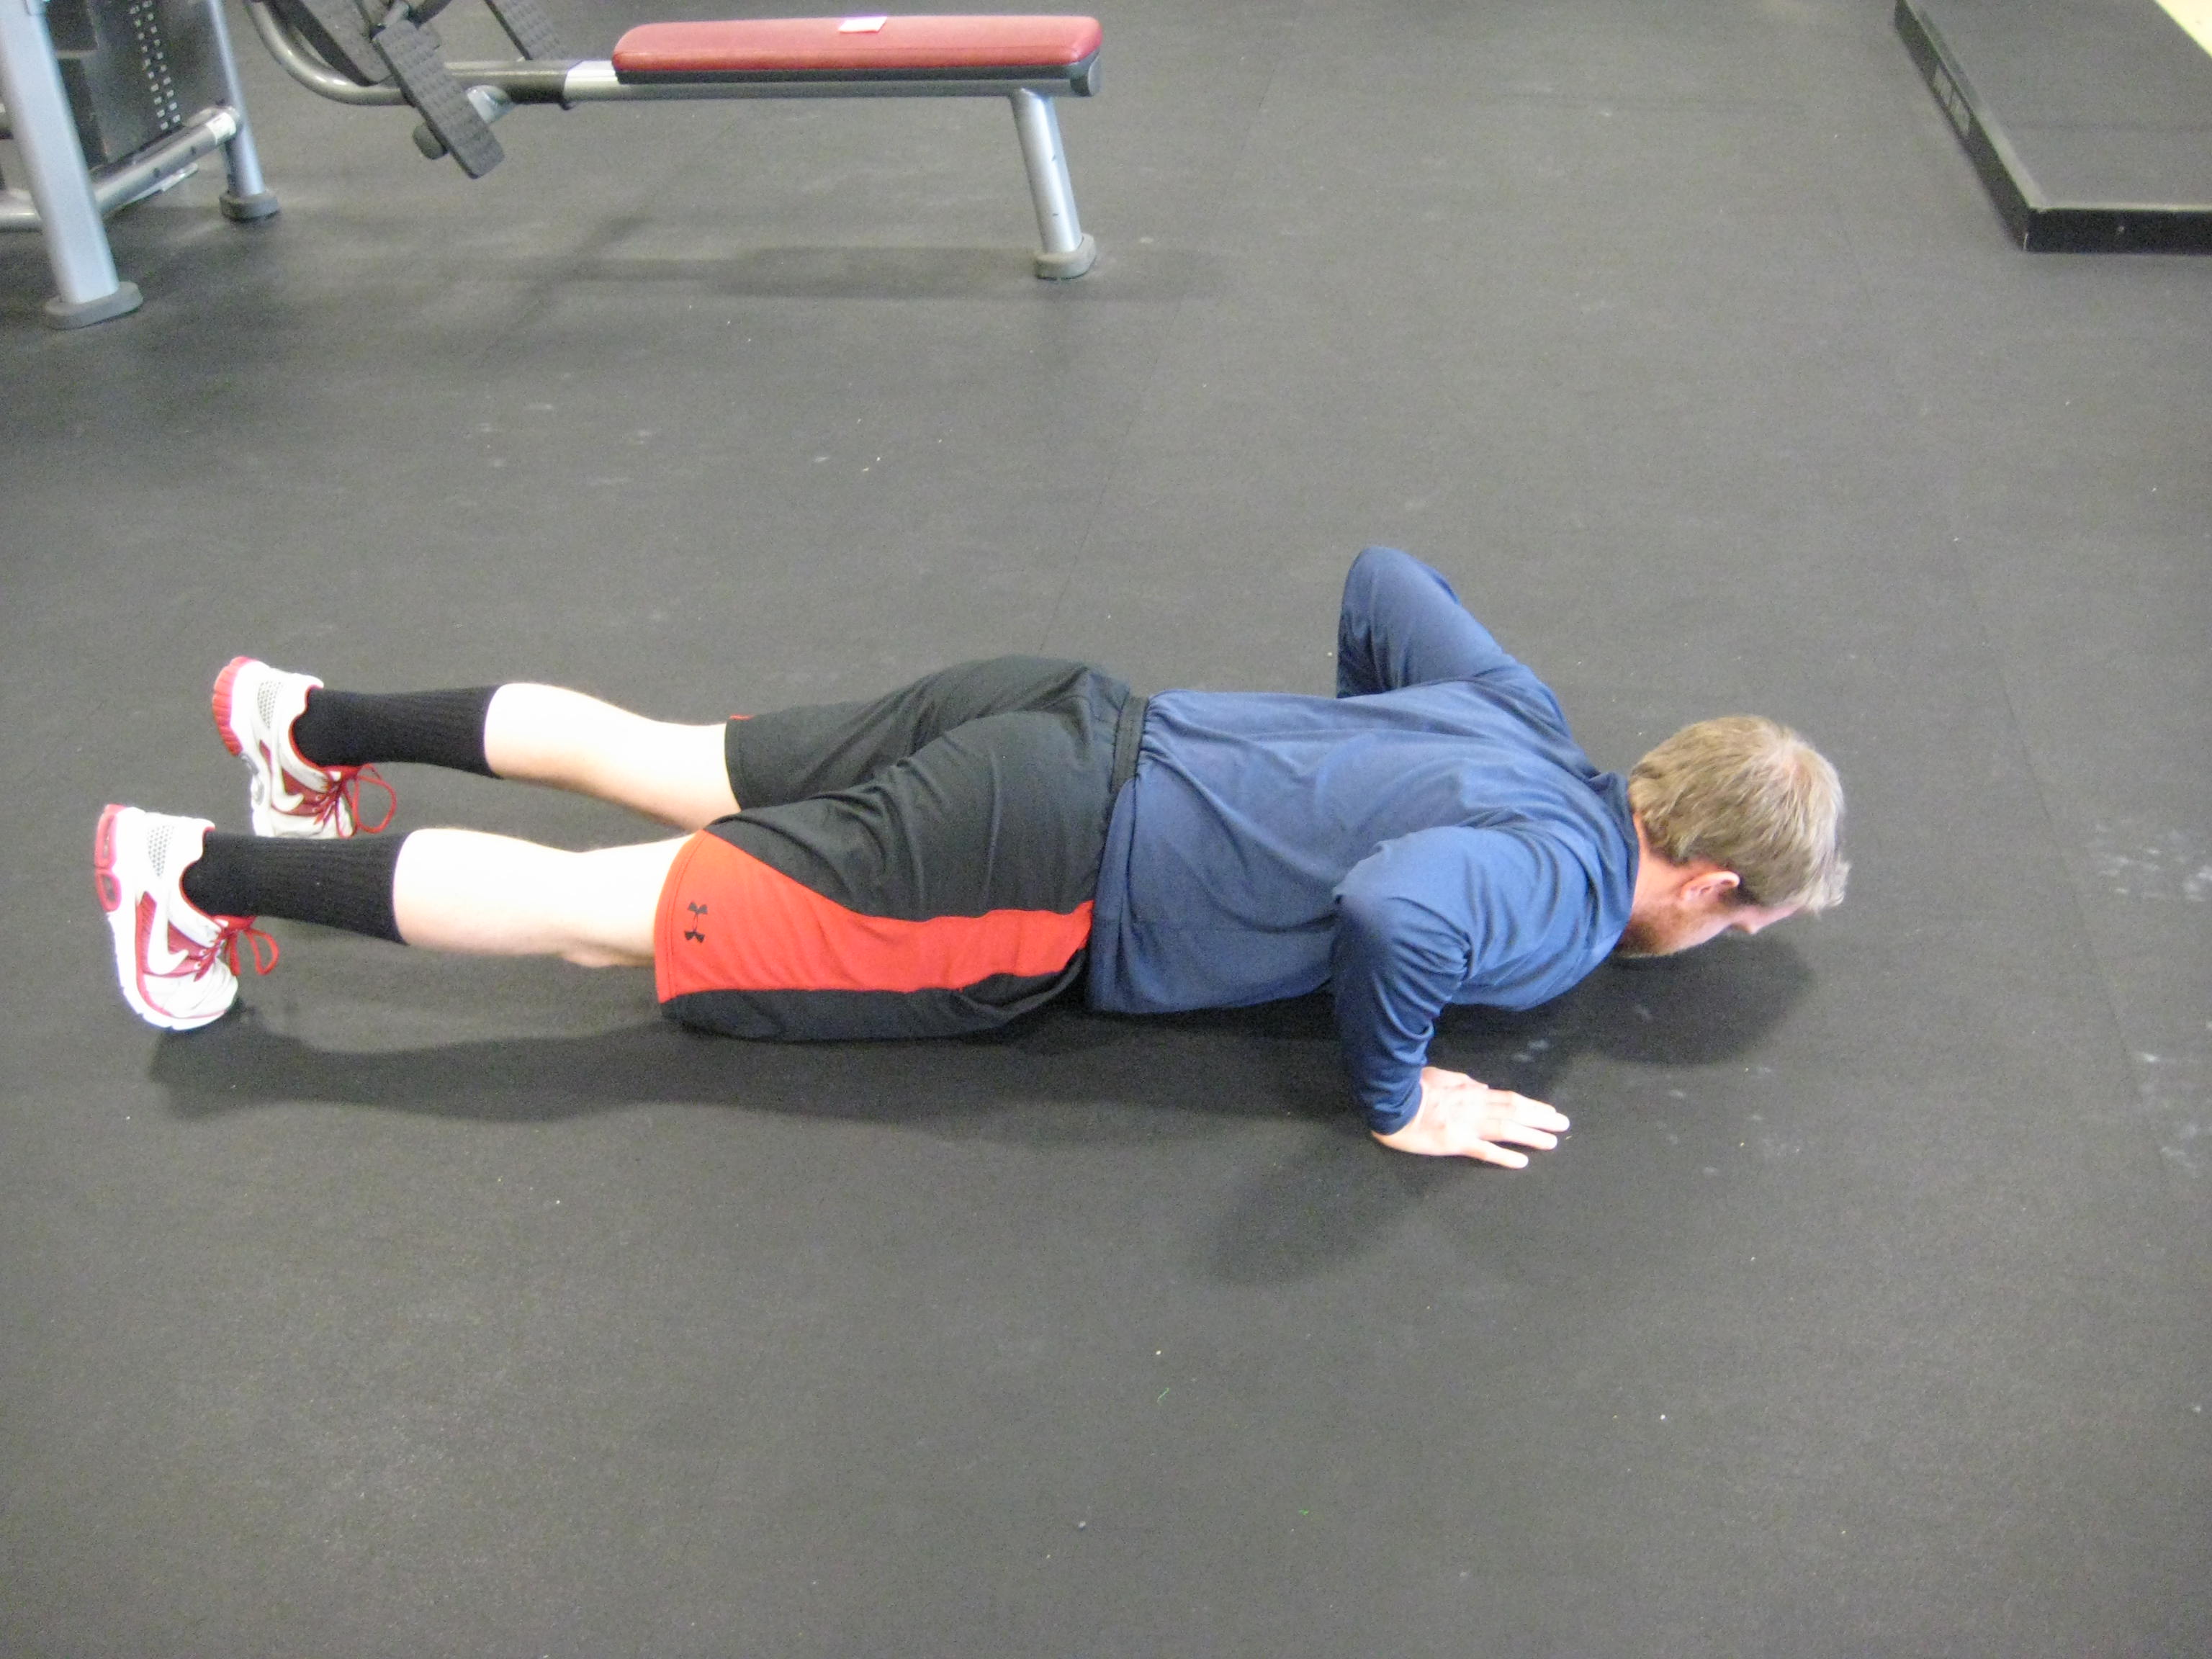
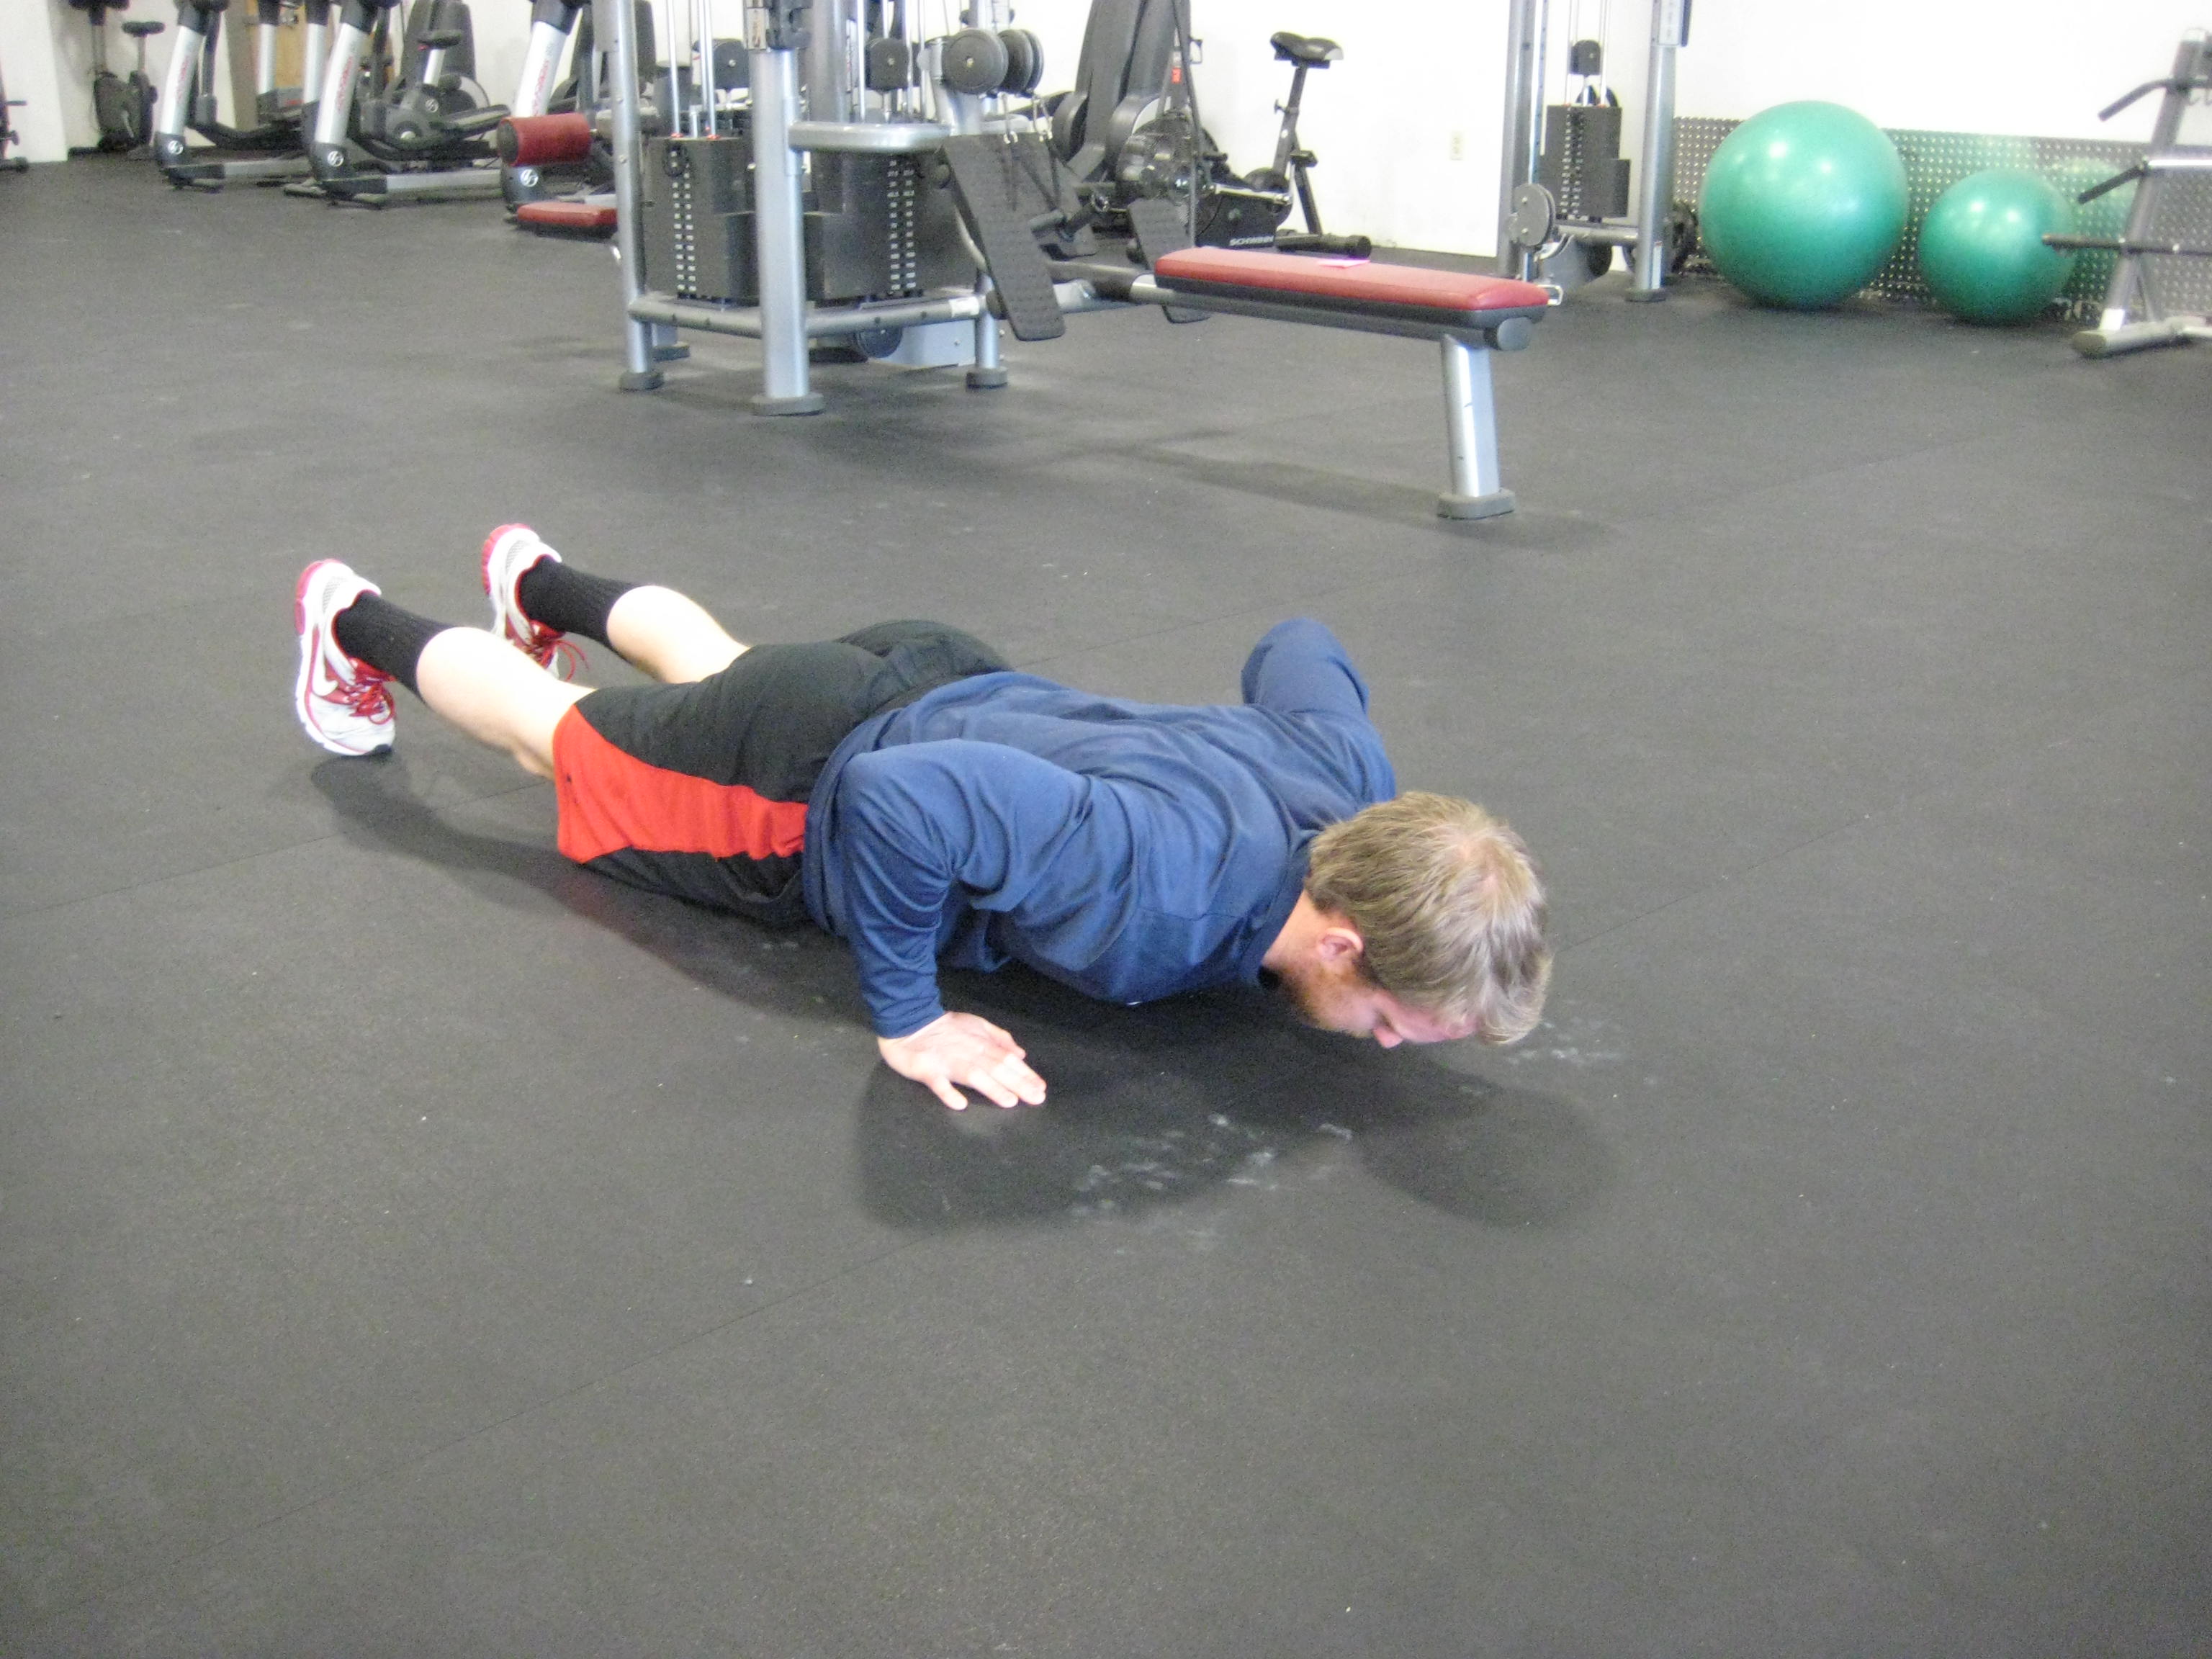
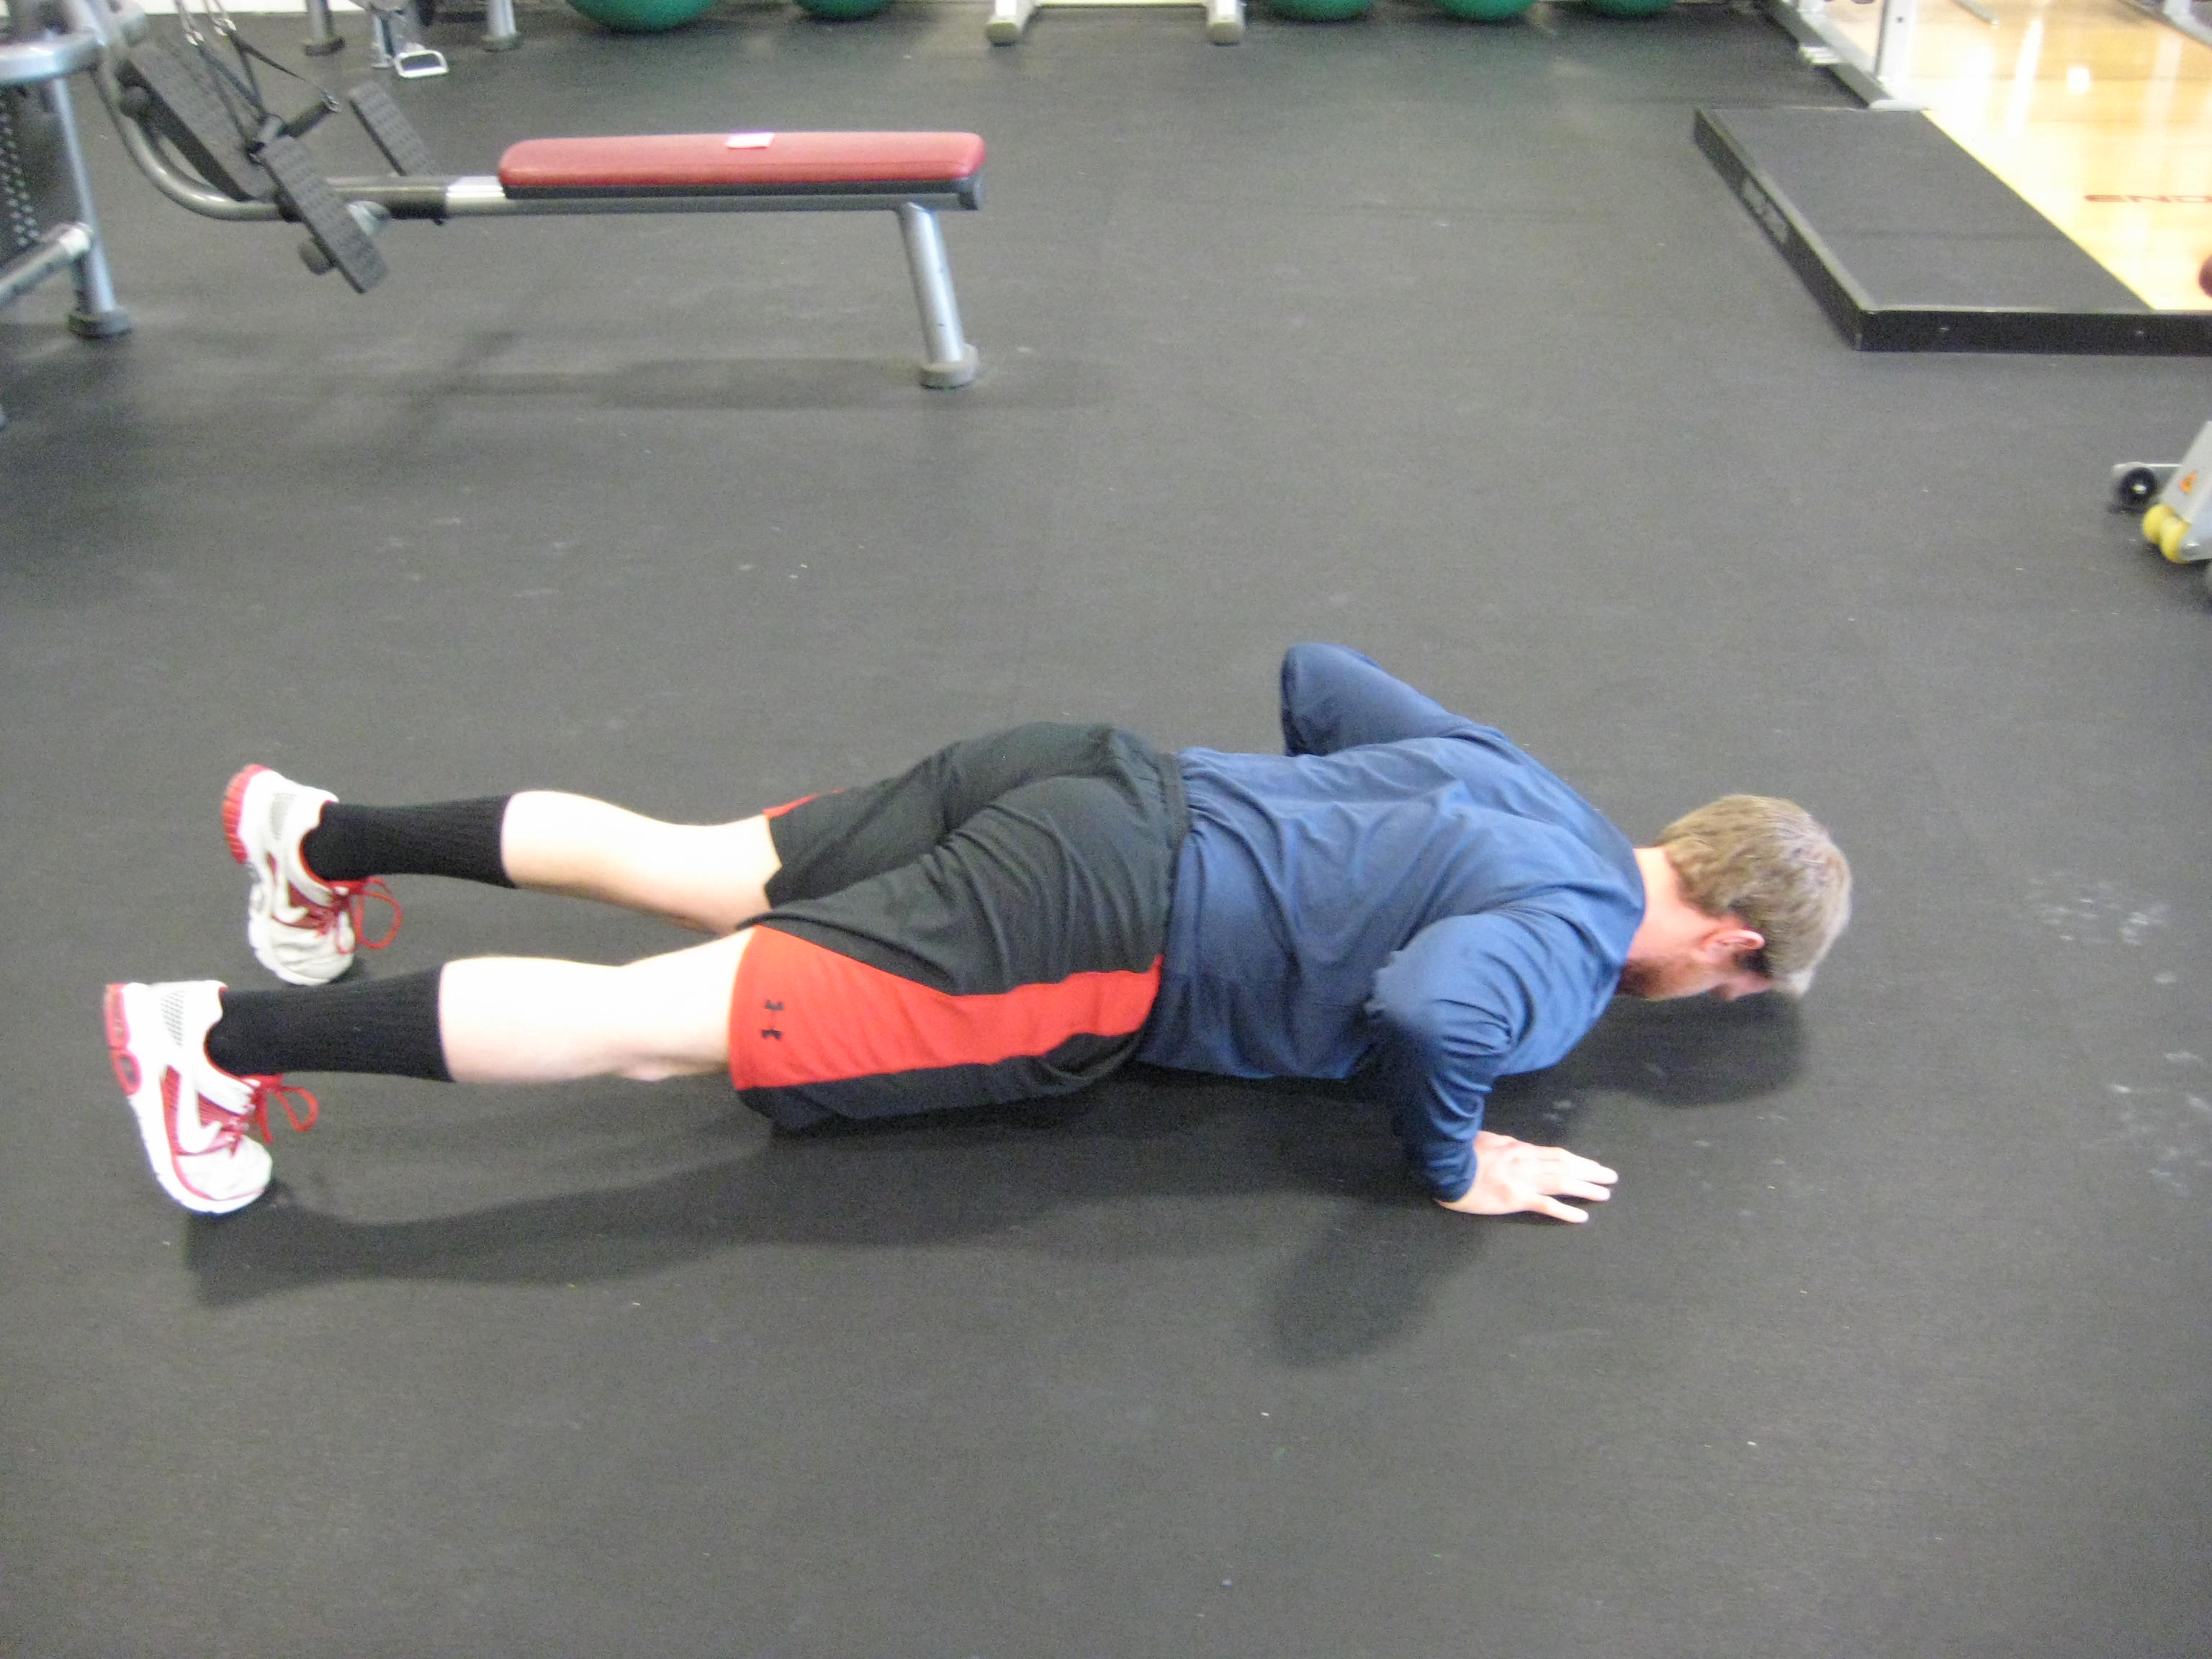
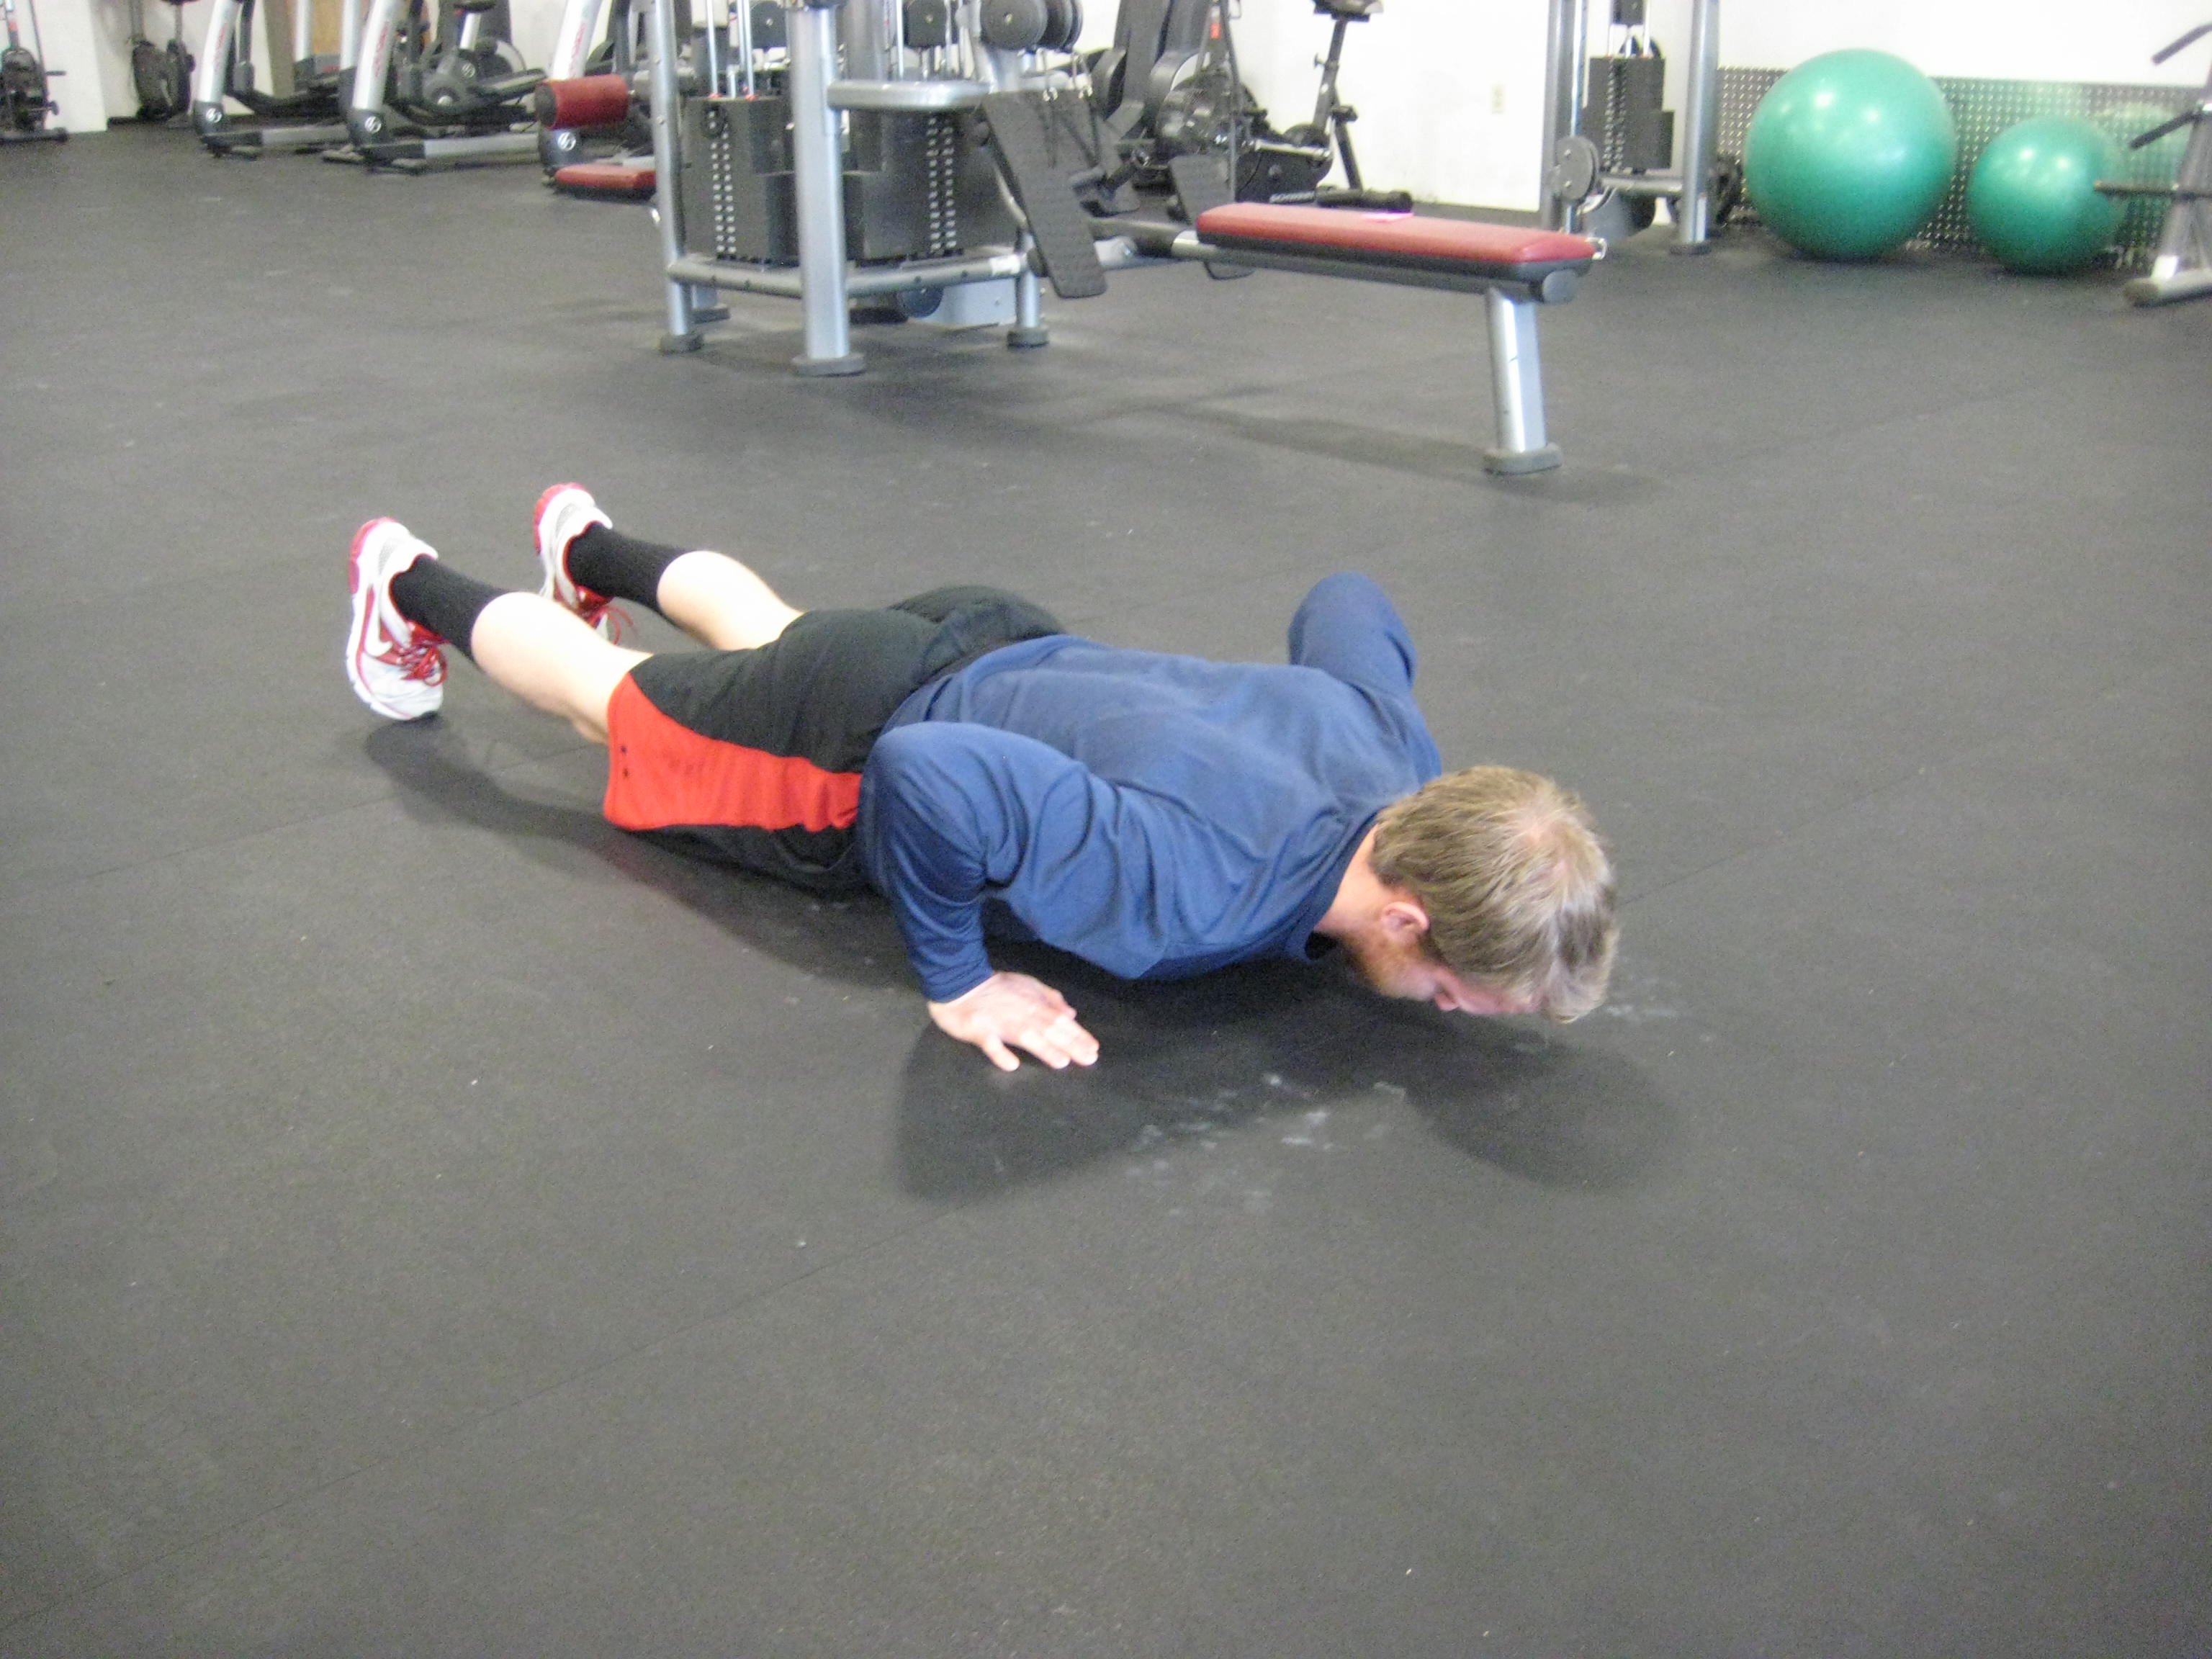
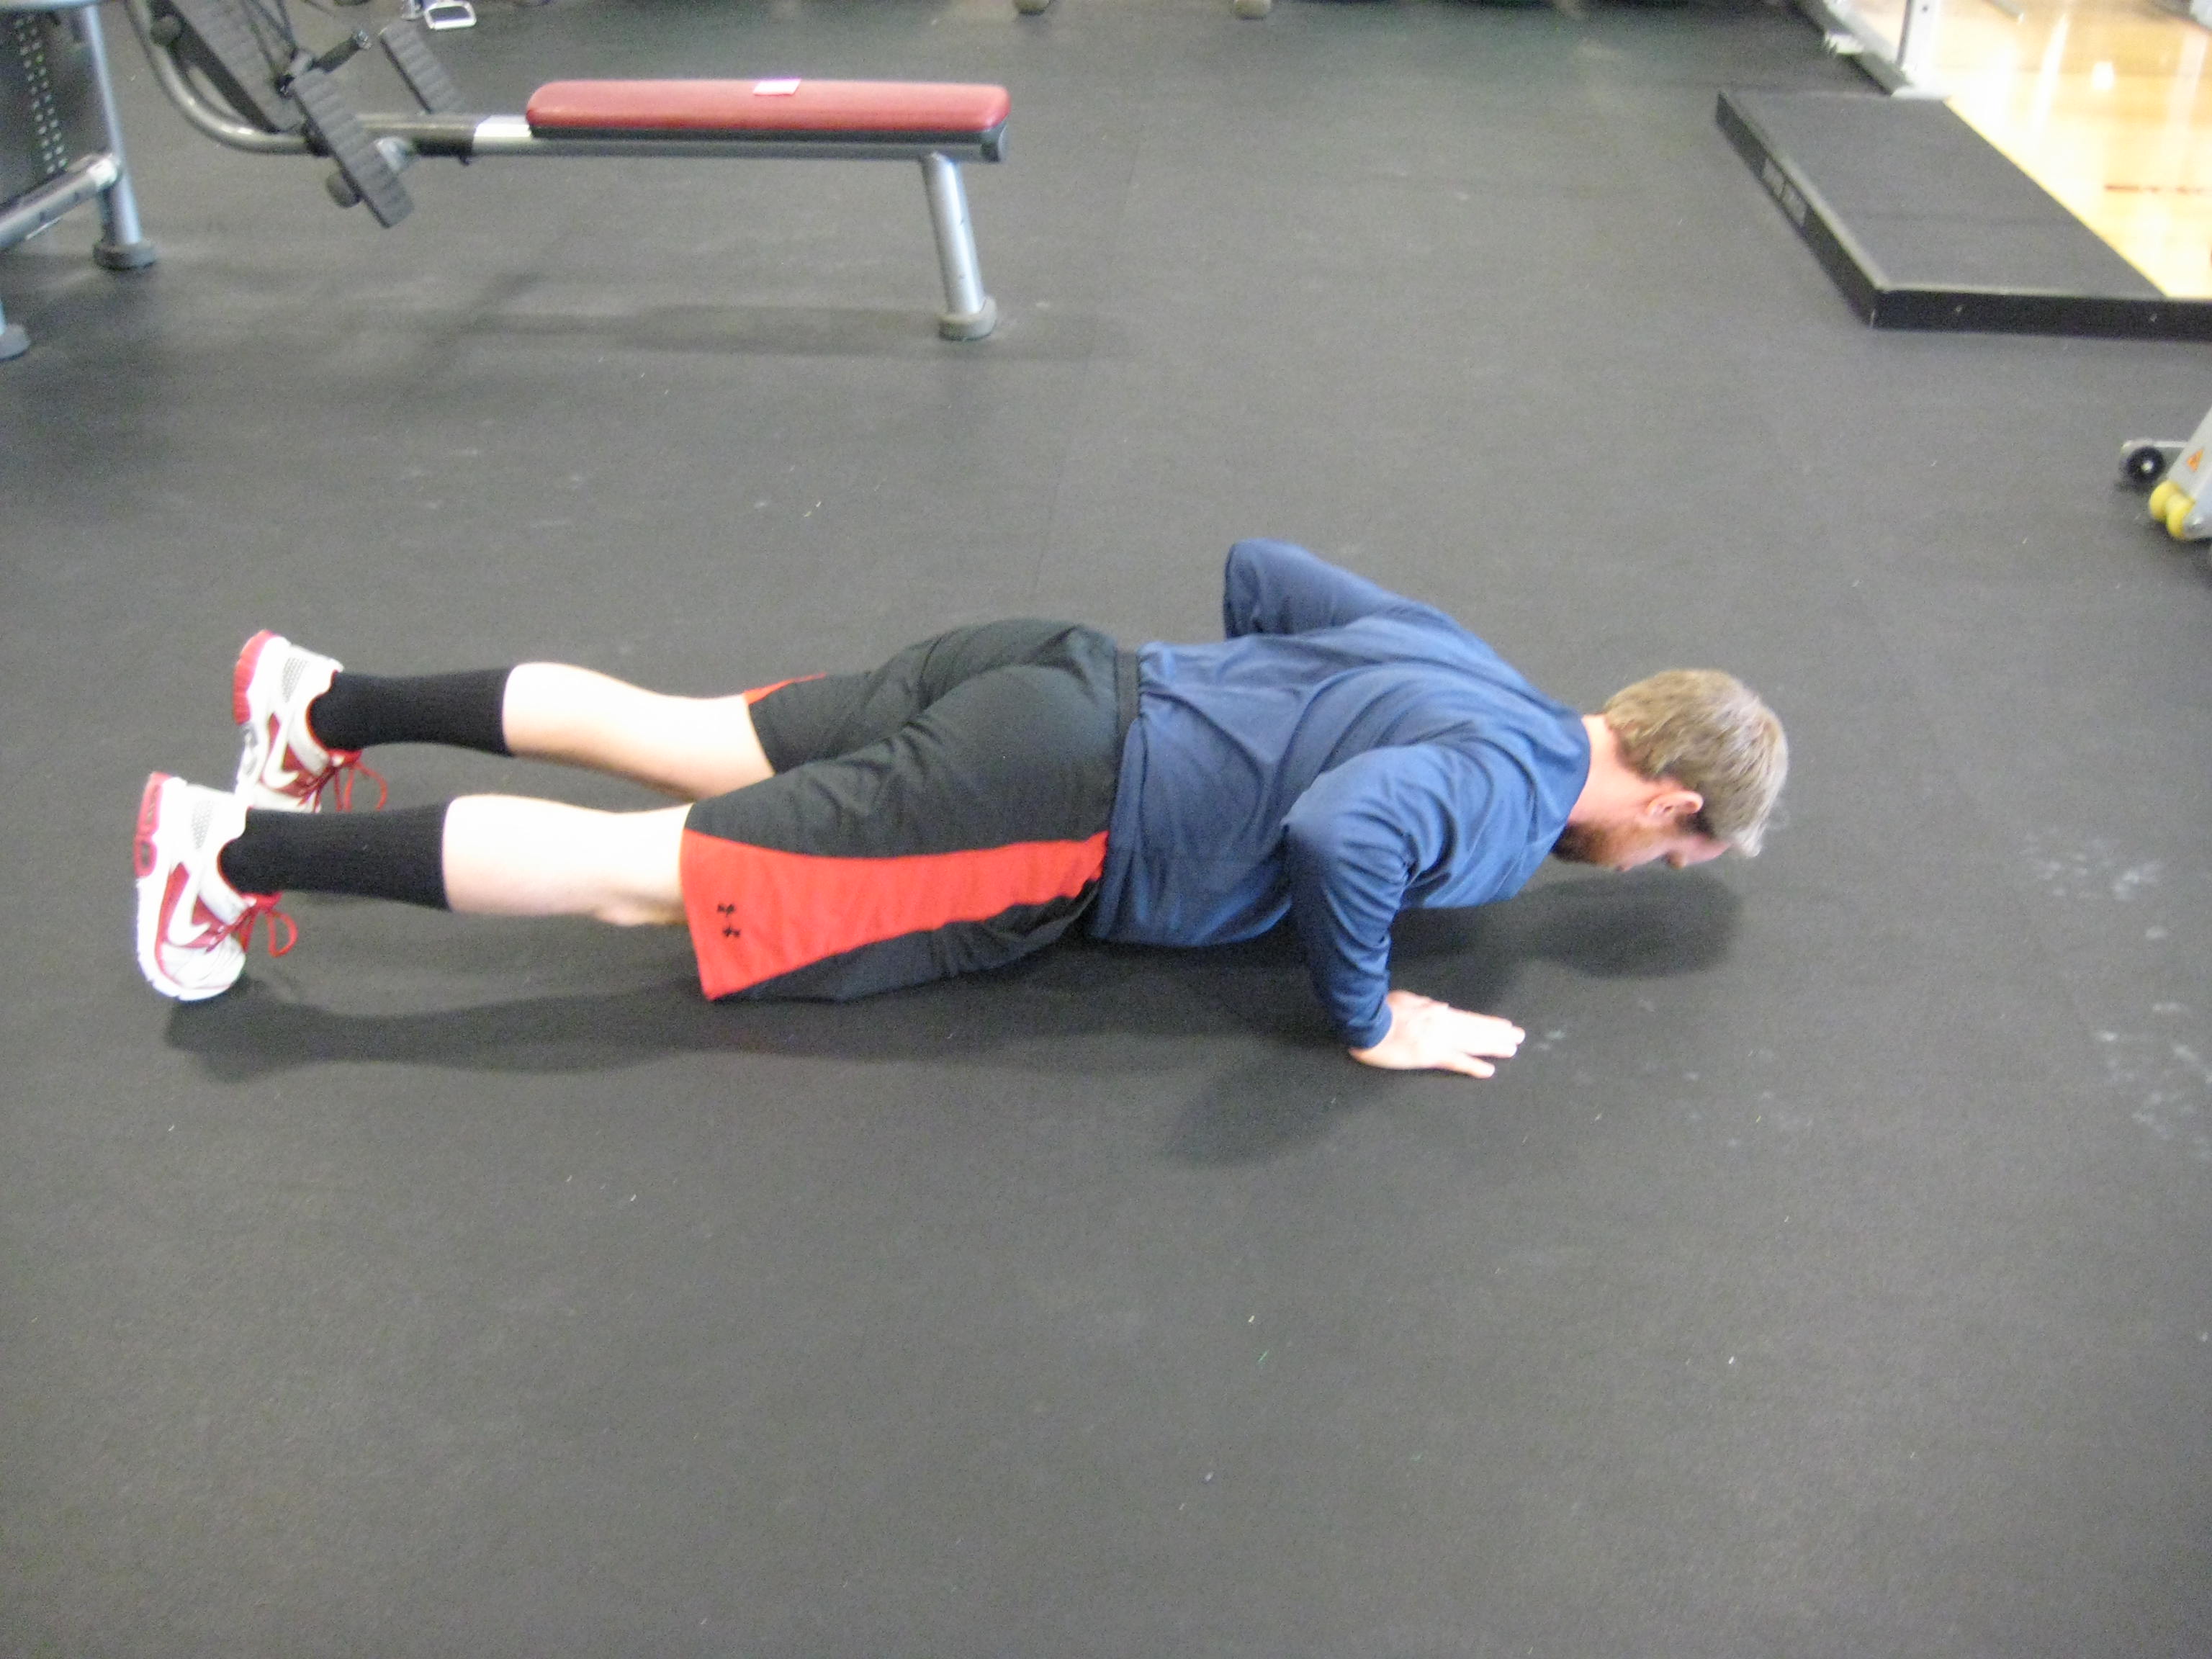
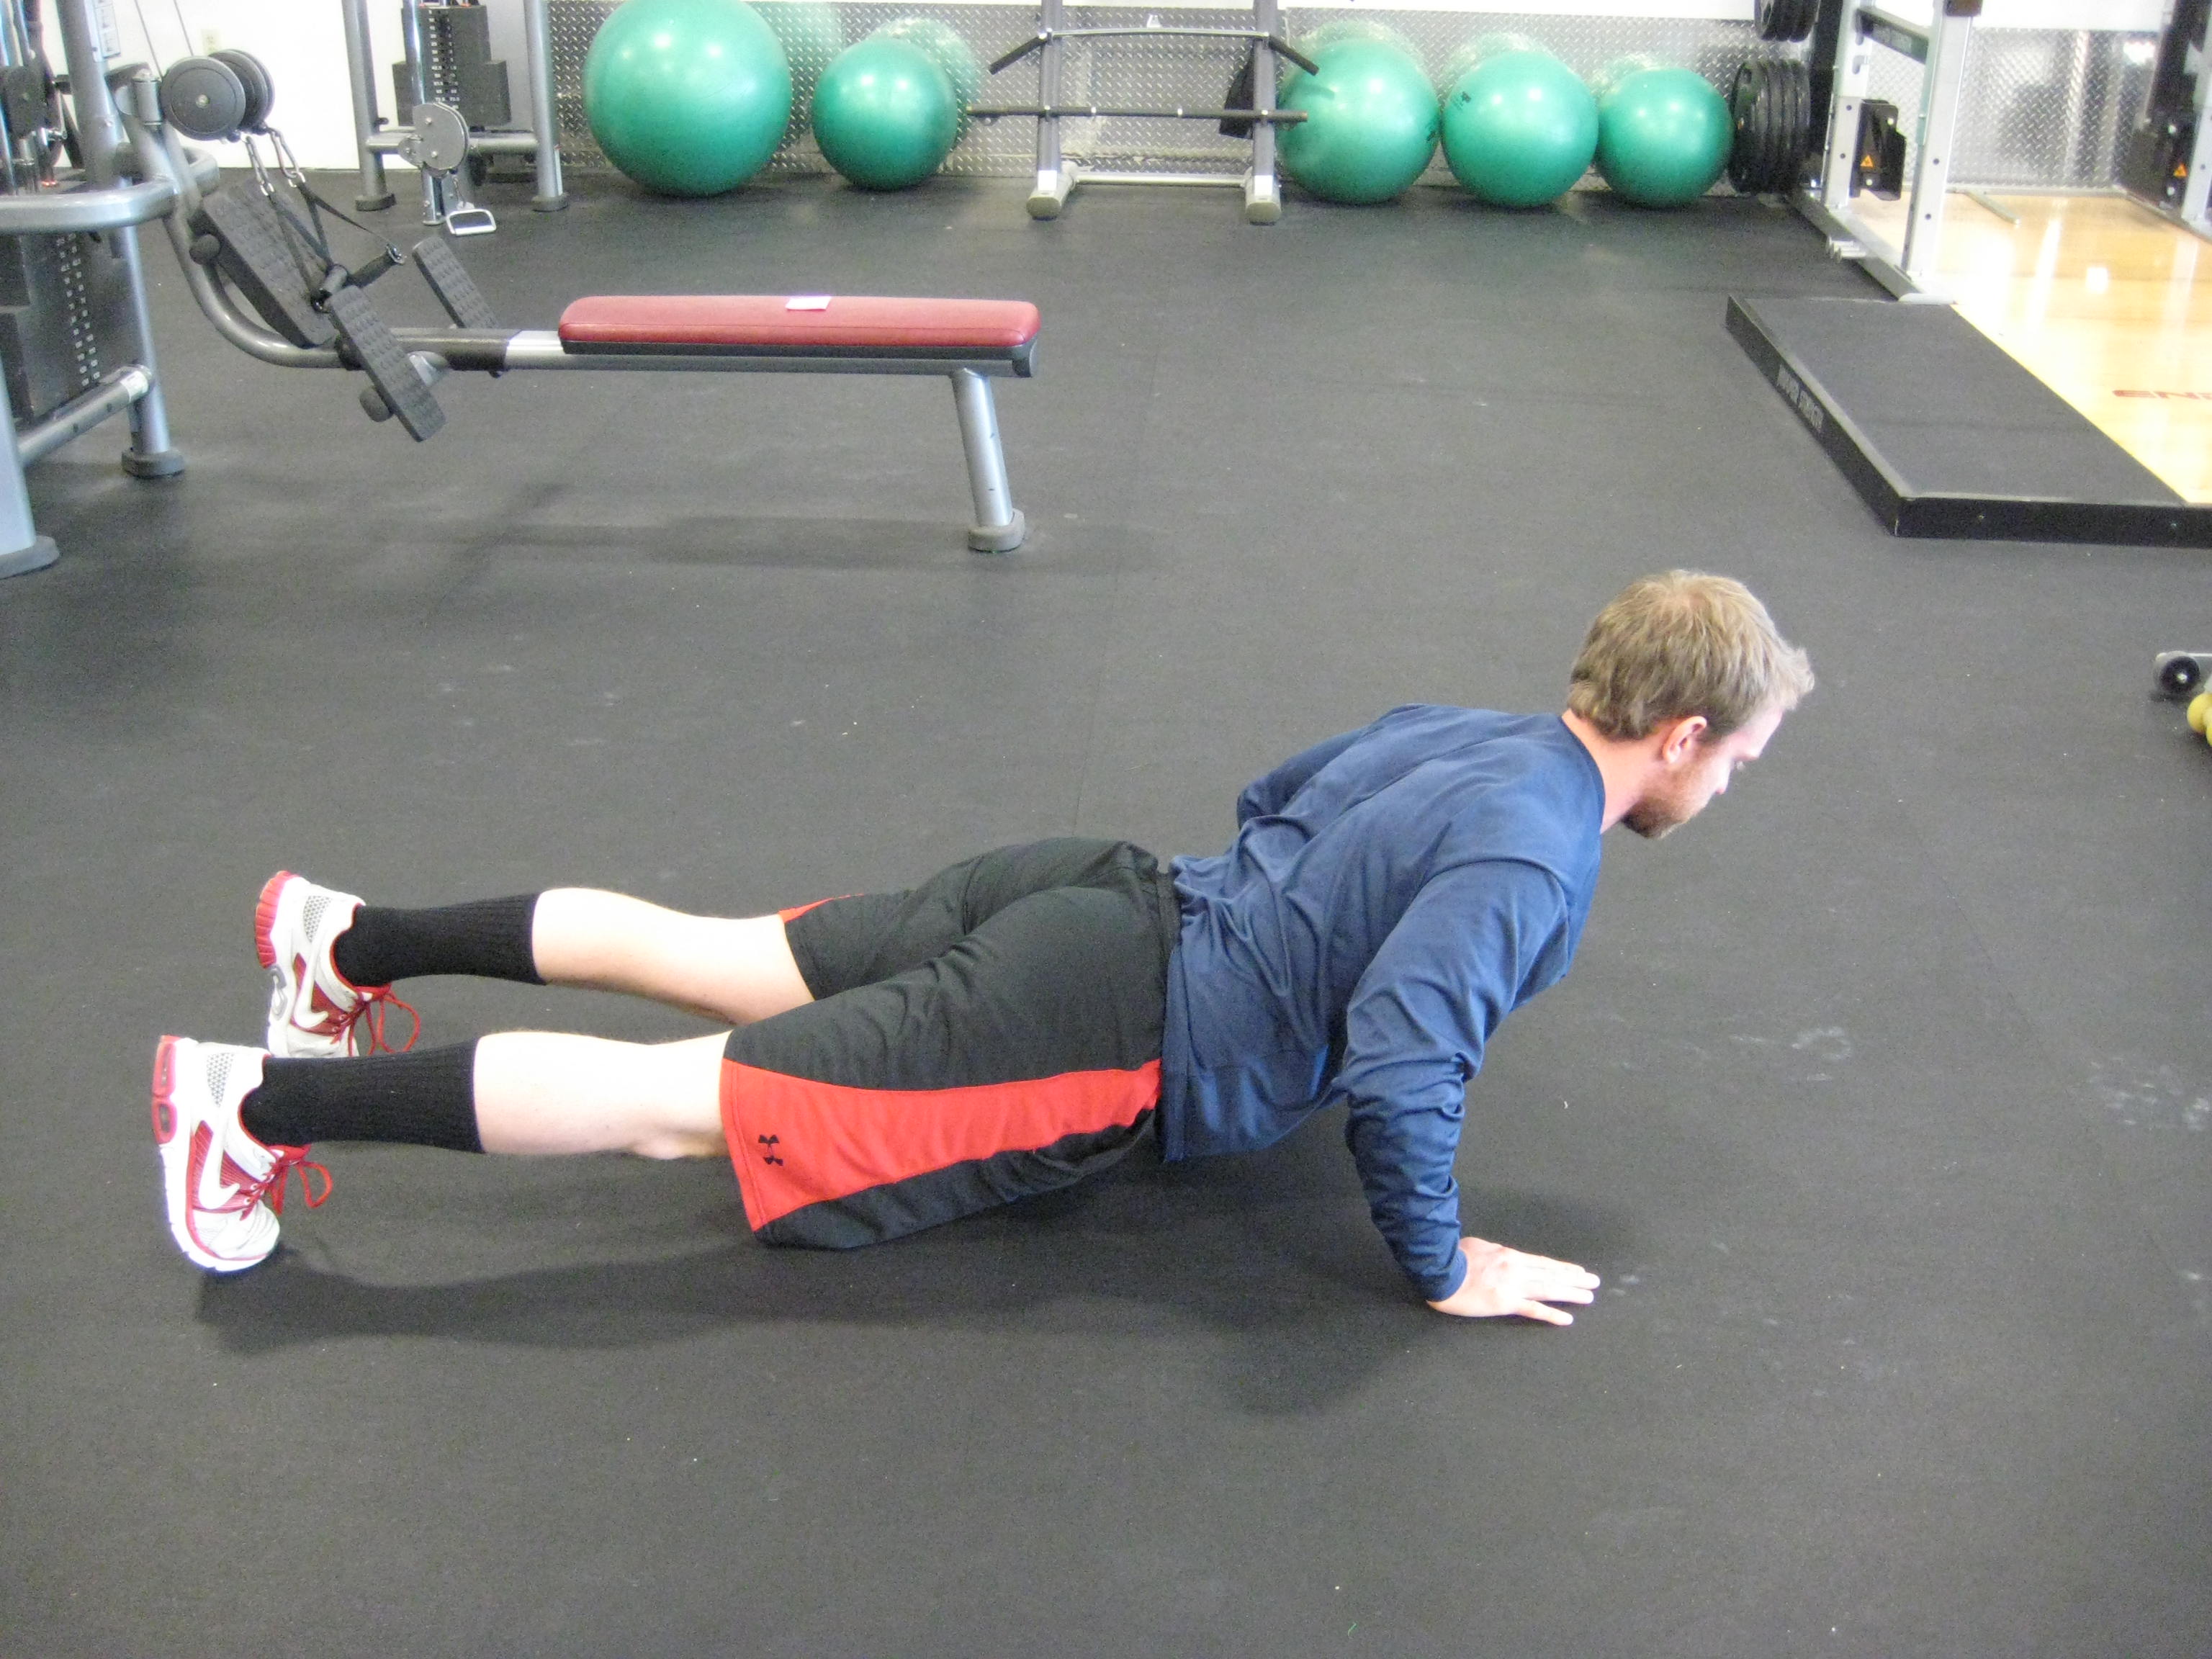
The images below demonstrate what each of these may look like.

Push-Up

Push-Up

Proper push-up position.

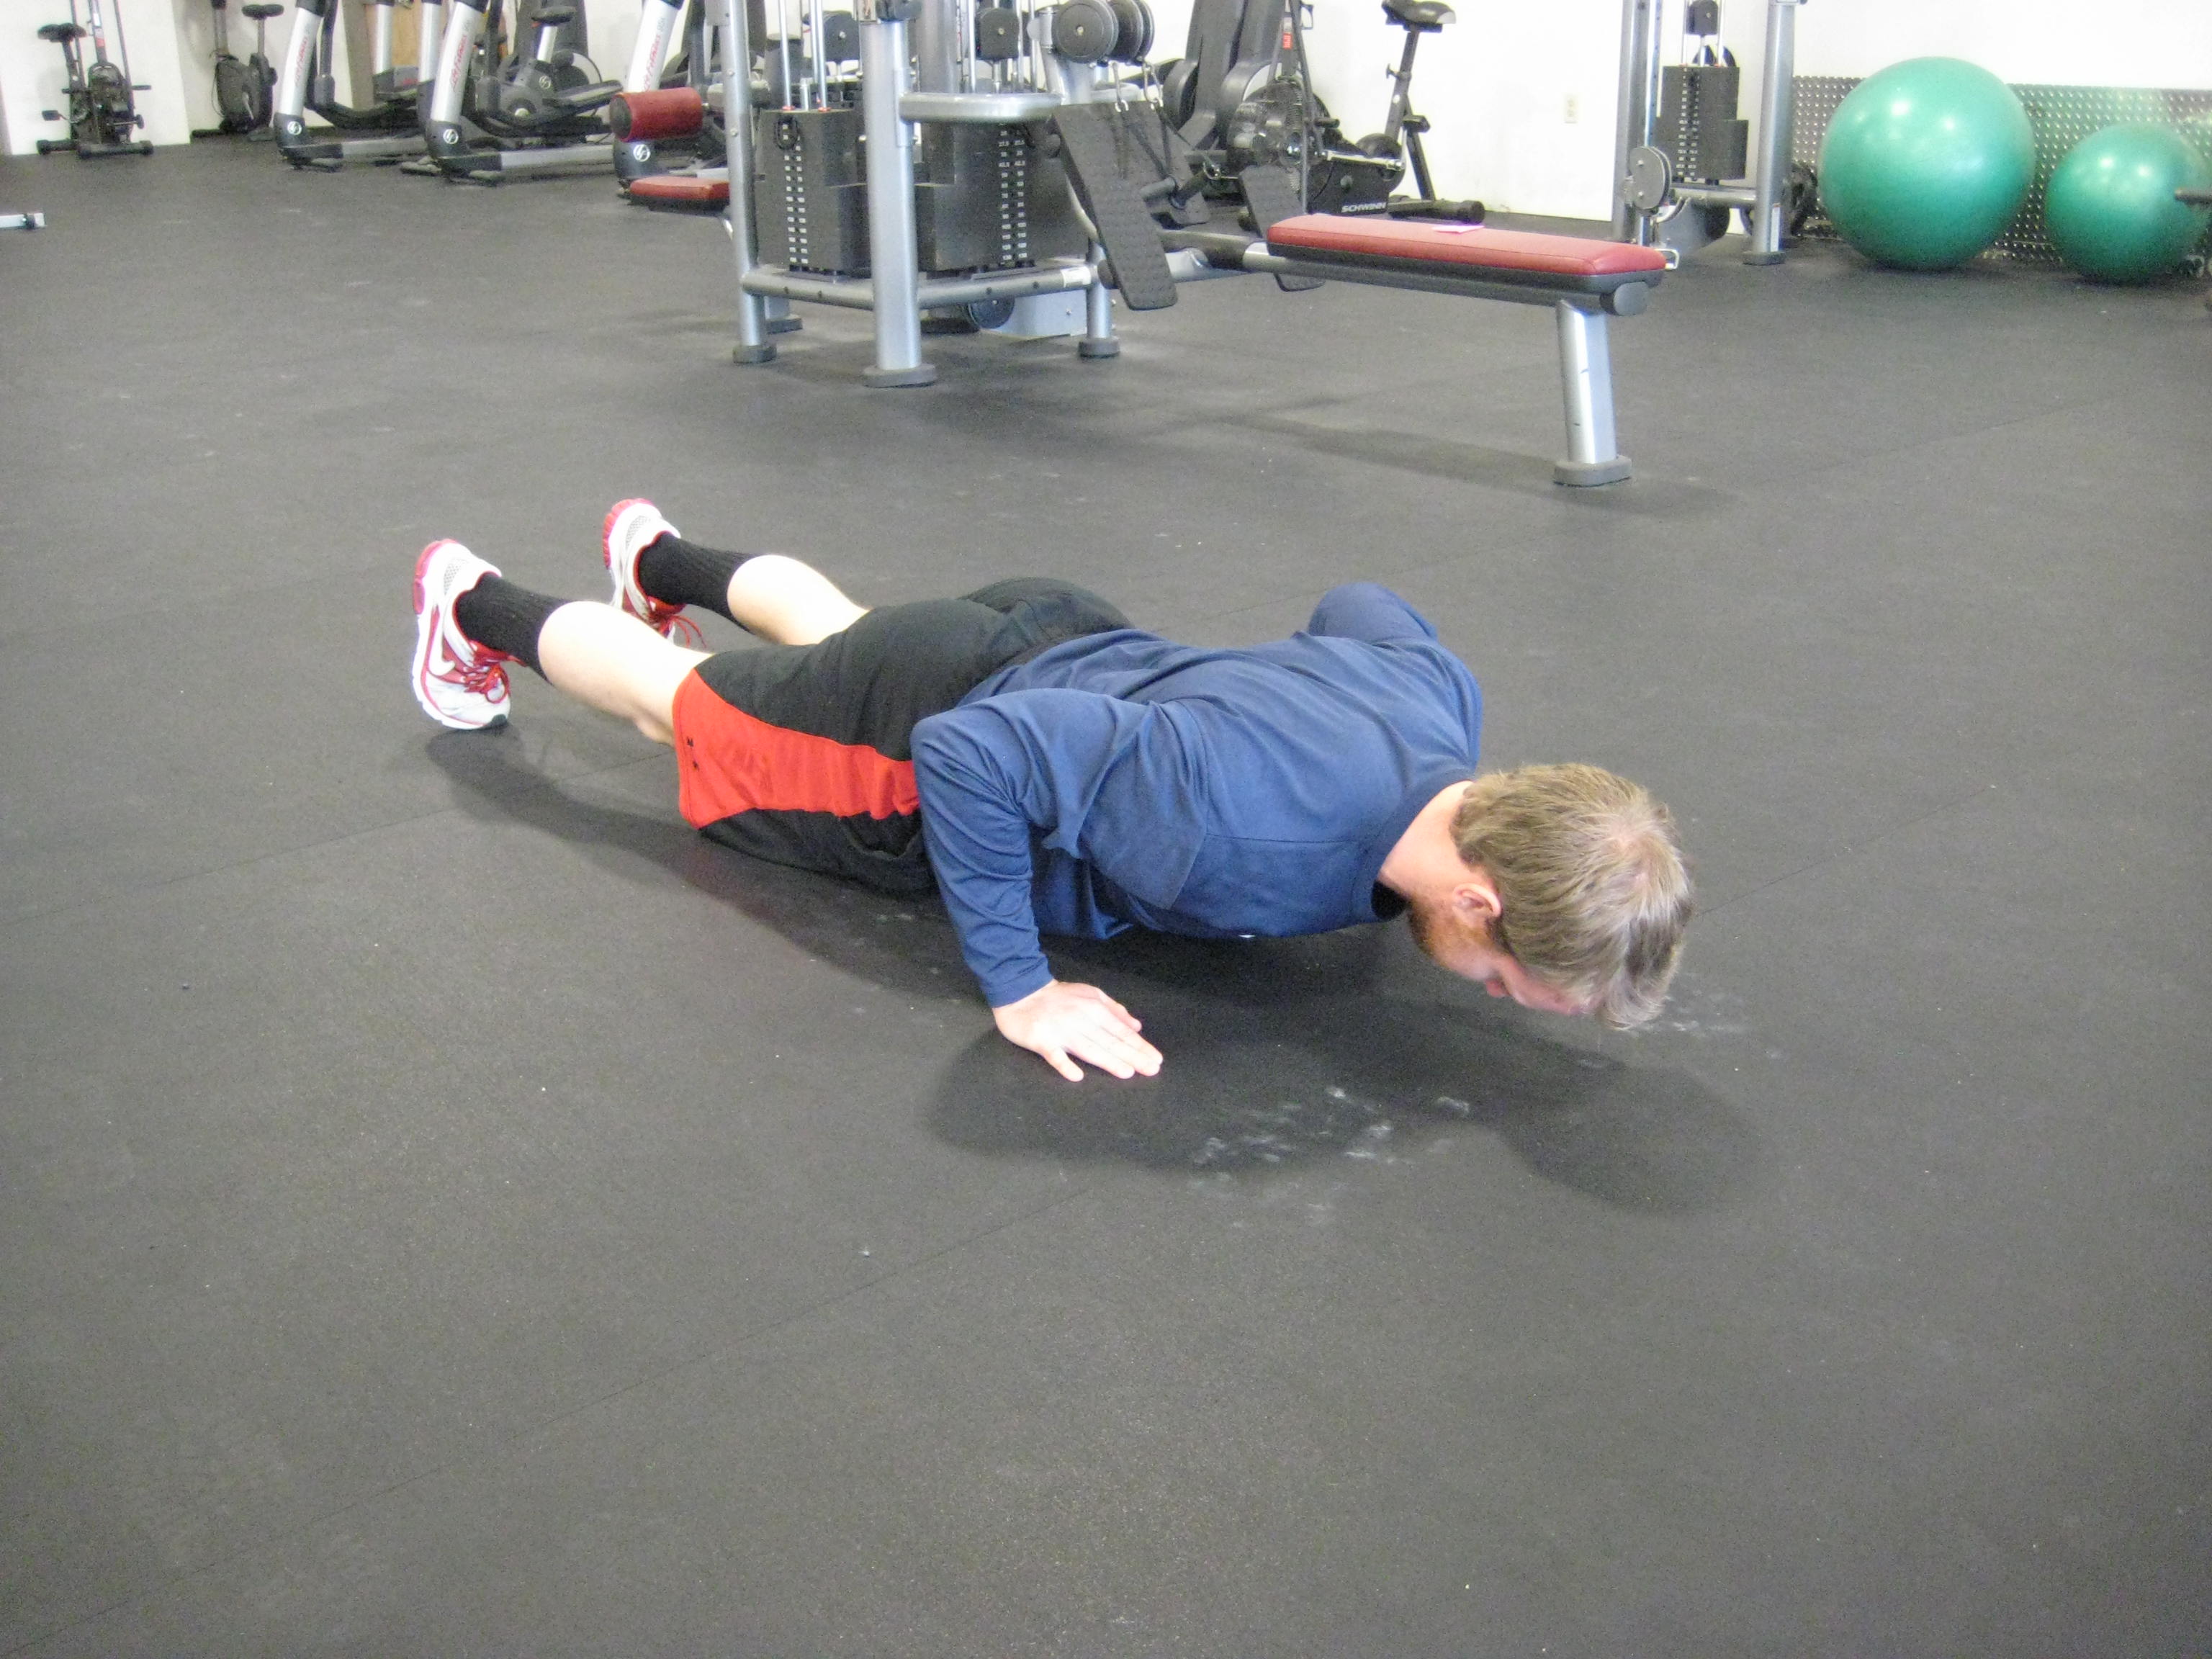
Push-Up w/ Excessive Extension

Push-up with excessive extension, common for athletes with poor core strength.

Push-Up with Shrug

Push-Up with Shrug

Push-up with shrug at bottom, a common flaw in athletes with poor scapulothoracic control. Has anyone seen my neck?

Push-Up with Anterior Scapular Tilt

My best attempt at mimicking a push-up with an anterior scapular tilt at the bottom, a common flaw in athletes with poor scapulothoracic control. Note how the shoulder blades appear to angle forward and down toward the ground, and how close the front of my shoulders are to the ground compared to the first set of pictures.

To address these, there are a few different options.

1) Regress the push-up to a front plank. This will help provide an opportunity for the athlete to learn the body awareness of a “tall” position with a neutral spine, as well as help develop the stabilization/strength necessary to maintain this alignment with more dynamic activities.

2) Regress to a “scap push-up” on forearms. This is a more dynamic progression from a traditional front plank that capitalizes on the same stabilization benefits, but adds a component of scapulothoracic movement and control. This allows the athlete to internalize the feeling of pulling the shoulder blades together as they descend down into the bottom position of a push-up, without over extending through their thoracolumbar junction (in their lower back a few inches up from their pant line).

3) Regress to an incline push-up. This is, by far, the regression we rely on the most at Endeavor. Allowing the athlete to perform the push-up on a raised surface decreases the resistance they need to push, ultimately making the exercise easier. This creates a better environment for us to reinforce how to engage the abdominals and anterior neck to prevent excessive extension, move the scapulae appropriately throughout the movement, or address any other movement dysfunctions they may have throughout the exercise.

This latter regression reminds me of a conversation I had recently with one of our interns. We were discussing all the things that can go wrong with a movement and the potential causes of this “dysfunction”. Rehashing what we’ve discussed here, the push-up pattern can go wrong because of: lack of abdominal strength/control, lack of anterior neck strength/control, strength, stiffness, or control imbalance of the scapulothoracic muscles, insufficient thoracic extension, lax anterior glenohumeral ligaments and therefore compromised joint stability, and lack of horizontal pushing strength, among others. If an athlete descends down into a push-up and the shoulder blades tilt forward, wing off the back, and or shrug (see pictures under the scapulothoracic control category above), I could immediately think:

  1. They have a tight pec minor (forward scapular tilt)
  2. Dominant upper and middle traps (scapular elevation/shrug)
  3. They have poor serratus anterior strength/control (scapular winging)
  4. They have poor lower trap strength/control (scapular winging and inability to pull shoulder blades back and down with descent into the bottom position)

Any one or all of these things could in fact be going on and require some extra attention. That said, in most cases the athlete simply hasn’t internalized what the movement should look and feel like. If regressing the difficulty of the exercise (e.g. putting them on an incline), providing a few simple coaching cues and a little practice time clean up the pattern, then all of the movement dysfunction diagnoses was for nothing. In other words, it’s important to give the athlete a true opportunity to learn the movement before breaking down what may be going wrong with it. A lot of times a lack of body awareness is the underlying problem, and some simple coaching cues are the solution.

Lastly, sometimes athlete will do one good push-up and then fall back into an ugly pattern, which was fairly comprehensively described in the original question (elbows flared out, heads dropping down, lower backs sagging, etc.). In this case, a great strategy is to progress them to a “bottoms-up” push-up. These can still be done on an incline, if necessary, but it allows the athlete to start at the bottom with optimal alignment and engagement, push up, and simply descend back down into the same position. This tends to clean up a lot of bad patterns for folks that have sufficient strength to perform the movement correctly, but may have gotten a little sloppy with their technique. It basically concentrates a lot of quality practice time into a condensed set.

Which regression/progression you choose is largely dependent upon the individual’s limitation and what you feel most comfortable teaching. Hopefully this gives you some ideas on simple ways to regress the push-up,  allowing youth and untrained athletes to develop the proper pattern and progress their strength optimally.

To your success,

Kevin Neeld
UltimateHockeyTraining.com

Please enter your first name and email below to sign up for my FREE Athletic Development and Hockey Training Newsletter!
A couple days ago I mentioned that Wil Fleming recently released his new DVD Complete Olympic Lifting. Today I wanted to follow up by sharing an article that Wil wrote that looks at 5 things you should consider before adding Olympic lifts into your program. Enjoy!

Wil Fleming

Should You Olympic Lift by Wil Fleming

The Olympic lifts have been around since the beginning of the weight training era.  Once the province of only the most meaty of meatheads they have gained popularity steadily since they were first included in athletes programs in the 1950’s.

Recently, with the explosion of Crossfit they have gained even more popularity and every Joe Schmo with a weight belt and a barbell has started to add them into their programs. It should be noted that Joe Schmo typically sucks at the Olympic lifts, at least that is the impression I get from the 1000’s of youtube clips I have watched.

So what about you? Should you start Olympic lifting? Are they even right for you? And are you ready to do them well?

Don’t worry I got your back like Joe Schmo’s weight belt has his.

1) The Olympic lifts are not for everyone.

Getting to work each day might happen a little faster if you drove an F1 car. Unfortunately, driving an F1 race car is not for everyone. It takes skills, it takes practice and it takes time to get good.

For all of your experience driving cars since you were 16, and despite the fact that you have watched all of the Fast and Furious movies several times, you might not be ready to drive an F1 car to work each day.

If you want to go fast in the gym, make huge gains in your athleticism, and muscle up in a hurry Olympic lifts could be the answer. Like an F1 car they are not for everyone

For everything you can gain from the Olympic lifts, they might not be right for you.

So how do you know if the Olympic lifts are not for you?

-You have had a history with back issues: While not inherently more dangerous than any other type of training with free weights (1) if you have had a history with back injuries you may be playing with fire particularly if you don’t have high quality coaching each day.

-You have never heard of the Olympic lifts, never seen the Olympic lifts and have spent the last year training bi’s, tri’s, and back and shoulders. Sometimes, its just too late to teach an old dog new tricks.

2) Get some skills first

When you talk to most Olympic lifting “gurus” they suggest getting some expert coaching in the lifts before you even attempt to do a single hang clean While coaching is a big part of being good at the lifts, a keen eye and a feel for the fundamentals will  get you most of the way there.

You need to know how to do three things really well before you even start playing with the Olympic lifts.

Hinge

All of my athletes from pro’s to middle schoolers must know how to hip hinge correctly before learning to Olympic lift.

We have to crawl before we walk, and hinging is among the steps that you need to take to “crawl” in the Olympic lifts.

The hip hinge is the basis for the start position in both the hang clean and the hang snatch. By achieving it you are tapping into the vast power of the posterior chain.

The hinge is the fundamental pattern that makes up movements like the RDL or kettlebell swing, and including plenty of hinge work before you get on the platform will help to ensure you success.

Squat

Like delivering one-liners in awesome action movies is to Arnold, squatting is second nature to the people reading this site.

So why is it important to re-learn how to squat to be good at the Olympic lifts?

The squat in an Olympic lift is different, rather than being at rest on your shoulders when you begin, the squat portion of the Olympic lift will require you to receive the bar as it begins to move downward.

What that means to you is you have to be seriously strong in the core before you can even begin to think about receiving big weights at the chest or overhead.

To use the squat to your advantage in the Olympic lifts, don’t just stick with the back squat. Add in the kettlebell goblet squat, a front racked goblet squat, and finally the front squat to get prepared to Olympic lift.

I won’t ask you to go into the full squat position to receive the bar, but the strength it takes to finish off a tough front squat rep carries over directly to being able to stand up at the top of a heavy power clean.

Jump and Land

When we were kids we spent a lot of time at the local park shooting hoops, and if we were lucky there was an adjustable goal nearby. When the goal got taken down to 8 feet the first thing we did was channel our inner Human Highlight Reel and threw down some monstrous dunks.

Fast forward 10, 15, or 20 years and you probably haven’t spent much time doing any maximal jumps in a while. Like an old flame, it is time to get re-acquainted with jumping and landing if you are thinking about adding Olympic lifts to your program.

The Olympic lifts are all about producing force during one phase, but they are equally about absorbing force during the second phase of the lifts.

Jumping and landing is a close mirror to what the Olympic lifts can do. Before getting to a bar add some vertical jumps to your program between sets of squats or hinges.

Your legs will be taxed but it will replicate moving and receiving a heavy bar and get you prepared for the lifts to come.

3) Nothing else will bring the same benefits

There is a reason that the top Olympic lifters in the world can squat more than anyone you have ever met, can outsprint most people over short distances, and have legendary vertical jumps.

They are capable of producing more power than other athletes. Power, in the physical sense means the amount of force multiplied by the speed of the movement.  Completing the Olympic lifts means you are training yourself to move greater loads at faster speeds.

Anyway you slice it this is a good thing.

4) Keep your program simple.

I like simple things: a beautiful sunset, meat and potatoes, and the humor of Adam Sandler movies. My program for using the Olympic lifts is no different.

To incorporate the lifts into your program all you need to do is pick 2-3 days per week and do your chosen lift prior to all other exercises in the program.

Just by adding 3-5 reps and 3-5 sets (depending on your goals) can mean you are working muscles you didn’t know you had and adding explosive strength.

The Olympic lifts are the biggest “bang for your buck” exercises that we have in our arsenal. They work the most motor units, and require the most coordination to complete.

Being fresh when you complete them isn’t just an idea it’s a necessity.  You don’t get up in the morning and watch 2 hours of TV before going to work. No, you wake up and attack the day by getting your workout in, or heading off to your job. High priority tasks are routinely placed at the beginning of the day.

The Olympic lifts are no different. They need the most attention and should go first in your training session.

Select the snatch, the clean, or the jerk and put them on a rotation, doing 2 per week. If you really want to ramp up your improvement in the lifts add a complex to warm-up, or some partial lifts (clean pulls or snatch pulls) to take your technique or power to the next level.

5) Remember you’re probably not going to THE Olympics

Even though you are doing movements called Olympic lifts it doesn’t mean you are going to that Olympics. It just means you are taking your training seriously and want to see benefits that your typical gym goer never even dreams about.

Don’t get too wrapped up in catching the lifts in a deep squat, or being absolutely, and completely technically perfect on every lift. Get comfortable with the technique, ask some people that are more accomplished than you are too look at your lifts, and know your limits.

Believe me, just because you add some cleans and snatches to your program, the Bulgarian national team is not looking over their collective shoulders. Keep up the good work and reap the benefits.

Conclusion
If you are comfortable staying the same and doing the same program over and over, then forget everything I said. If you want to see traps sprouting from areas you didn’t know they could, and become more athletic then adding the Olympic lifts to your program is a safe and effective way to go.

References:

1)   Calhoon G, Fry AC. Weight-Training injuries: common injuries and preventative methods. J of Ath Training. 1999;34(3):232-238

About the Author:

Wil Fleming (CSCS, USAW) is the owner of Force Fitness and Performance  in Bloomington, IN. He trains athletes from middle school to the pros in his successful facility. Prior to being a gym owner Wil was an All-American track athlete and a national champion Olympic weightlifter. Learn more about him at www.completeolympiclifting.com

To your success,

Kevin Neeld
UltimateHockeyTraining.com

P.S. Don’t forget that the 40% off sale on Complete Olympic Lifting ends on Friday!

Please enter your first name and email below to sign up for my FREE Athletic Development and Hockey Training Newsletter!
I hope you had a great weekend. I spent the last 4 days in Phoenix at one of Andreo Spina’s combined Functional Anatomical Palpation and Functional Range Releases courses and then shuttled right out to Lincoln, NE for a PRI course, where I still am. Lots to soak in, but great information. Looking forward to coming home and applying it (and sleeping!).

Right before I left, I had an opportunity to watch a new DVD from Wil Fleming called “Complete Olympic Lifting” which dives into teaching the highly technical Olympic Lifts.

If you’re not familiar with Olympic lifting, it’s one of the most effective strategies for increasing power and high load deceleration in athletes. Take a few minutes to watch the video below, which features some of the world’s strongest athletes in the Olympic lifts.

When I watch videos of these guys, I’m always impressed with two things:

  1. How incredibly strong/powerful these folks are
  2. How smooth the lifts look, even at extremely high loads

Watch the guy at 2:02. The guy set an Olympic record and it looked as clean and quick as a practice load. THAT is exactly how Olympic lifts are supposed to look. Check out the celebration from the guy that nails the lift at 2:55. Think he has some power?

Olympic lifts, and their variations, are very clearly an effective means of developing high levels of power in athletes. The largest barrier to integrating these lifts into your training program is understanding how to do them correctly. The lifts are very technical, can be hard to learn, and at times frustrating to teach. This is one of the biggest problems with some CrossFit and many high school strength and conditioning programs; inexperienced lifters are performing highly technical lifts with insufficient supervision/instruction.

In addition to being technical, the Olympic lifts also require great mobility and stability throughout the body. As I’ve talked about in the past, many people will have restrictions in the ankles, hips, and thoracic spine AND insufficient core strength/stabilization that will need to be addressed prior to jumping into advanced lifting.

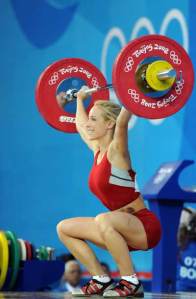
Female Overhead Squat

Deep overhead squatting requires extremes of ankle, hip, and thoracic mobility, as well as outstanding stability through the lumbar spine and shoulder complex.

These are just a few of the reasons why I liked Wil’s Complete Olympic Lifting DVD so much. The DVD opens with a section on “readiness” assessment and requisite movement requirements. In other words, it helps identify whether you’re a good candidate to performing the lifts in the first place, which is a necessary first step to ensure you don’t get hurt. Wil then breaks down detailed teaching progressions for the clean, the jerk, and the snatch, outlining common mistakes, the reasons why athletes make those mistakes, and how to correct them. In addition, he provides a TON of terrific coaching cues, which will allow coaches to say less, but get more out of their athletes, and is extremely beneficial for athletes who can use these same cues as self-reminders if they’re training on their own.

Colby Cohen hang cleaning 235 for 3 reps at Endeavor 3 college hockey players performing a 1-arm DB hang snatch at Endeavor a few Summers agoOlympic lifts and their variations are an important piece of our programming at Endeavor. So much so, in fact, that I paid for David Lasnier and I to take the USA Weightlifting Sports Performance Coach certification a couple years ago, which essentially takes a weekend to dissect the clean, jerk, and snatch, just as Wil has in this DVD. Honestly, I was very happy with what I learned at that course, and thought it was ~$900 (for the two of us) well spent. After watching Wil’s DVD, I think the information is almost identical, but I picked up some great new coaching cues that I didn’t hear at the course, and the DVD is available at a fraction of the price. If you’re interested in learning how to perform the Olympic lifts (to help with sports performance, to compete at some point, to assist in your CrossFit pursuits, or just for fun) or interested in teaching them to athletes more effectively and efficiently, I highly recommend you check out Wil’s DVD.

For a limited time, you can get Complete Olympic Lifting at a 40% off discount. The sale ends Friday so if you’re interested, make sure you move quick!

Click here for more information >> Complete Olympic Lifting

To your success,

Kevin Neeld
UltimateHockeyTraining.com

Please enter your first name and email below to sign up for my FREE Athletic Development and Hockey Training Newsletter!