As a final reminder my 4th of July Sale ends Friday. Check out the links below if you’re interested in saving some loot:

  1. Ultimate Hockey Training ($35.95 $19.95)
  2. Ultimate Hockey Transformation (Pro: $147 $77 Elite: $117 $57)
  3. Optimizing Movement ($97 $47)

3 Rolling Exercises You Should Be Doing

*Several of the videos in this articles are large, and take a bit to load. Please be patient.

Going through a general foam rolling sequence is helpful in both increasing circulation as part of a warm-up and in troubleshooting some nagging areas of “stiffness.” Once athletes establish a regular routine of rolling, it can be helpful to show a few different strategies to address specific areas. These are three rolling exercises I show a lot of our more experienced athletes that often have a very powerful impact on how they feel and move afterward.

Hip Rotators

Most people are familiar with how to roll their glutes. While this is beneficial, it’s really only addressing the most superficial level of musculature. Many athletes, and almost all hockey players, are stiff throughout their entire posterior hip, including the rotators that are “deeper” than the glutes.

Hip Rotators
 

When you roll with your knee bent, as I am in the above video, you stretch the glute, thereby increasing the resistance to the ball sinking into the hip. By straightening the leg, you relax the superficial layer and allow the ball to sink deeper, where it can influence the hip rotators.

Because of the size of these muscles, I often recommend a “sink and breathe” technique over actually rolling around. See the video below for an example.

[quicktime]http://www.kevinneeld.com/wp-content/uploads/2015/07/Lax-Ball-Posterior-Hip.mp4[/quicktime]
Posterior Adductor Magnus

The adductor magnus is the largest of the adductors and is an easy muscle to find. It’s basically the mound of meat at the top of your inner thigh. If you grab your high right inner thigh with your left hand, your fingers will wrap toward the back of your thigh. If you sink your finger tips into your thigh a bit you’ll be able to find a natural groove between the back of the adductor magnus and the medial hamstrings. If you follow this groove up toward your hip, you’ll find that things get pretty “gunky” as you get toward the top (in the red circle area in the picture below). The inability to separate these muscle groups is one reason why people have a difficult time squatting to their full depth and is often a contributing issue in athletes with groin pain.

Hockey Training Hip Muscles Circle
[quicktime]http://www.kevinneeld.com/wp-content/uploads/2015/07/Lax-Ball-Posterior-Adductor-on-Box.mp4[/quicktime]
This is another “sink and breathe” exercise. Explore the top ~6″ or so along this groove, then sink into a sensitive spot and just sit and breathe until you feel some of the sensitivity dissipate. From here, you can straighten your knee and then rebend it. This basically keeps the adductor where it is, but stretches the hamstring, creating a relative glide between the two muscle groups.

Rectus Femoris/Vastus Intermedius

There are four separate muscles that comprise the quadricep group. Because they’re so superficial, they’re fairly easy to access with a foam roller.

[quicktime]http://www.kevinneeld.com/wp-content/uploads/2015/07/Foam-Roll-Front-Quad.mp4[/quicktime]
That said, it can be helpful to get into the rectus femoris, and especially BENEATH the rectus femoris into the vastus intermedius with a lacrosse ball.

Rectus Femoris & Vastus Intermedius

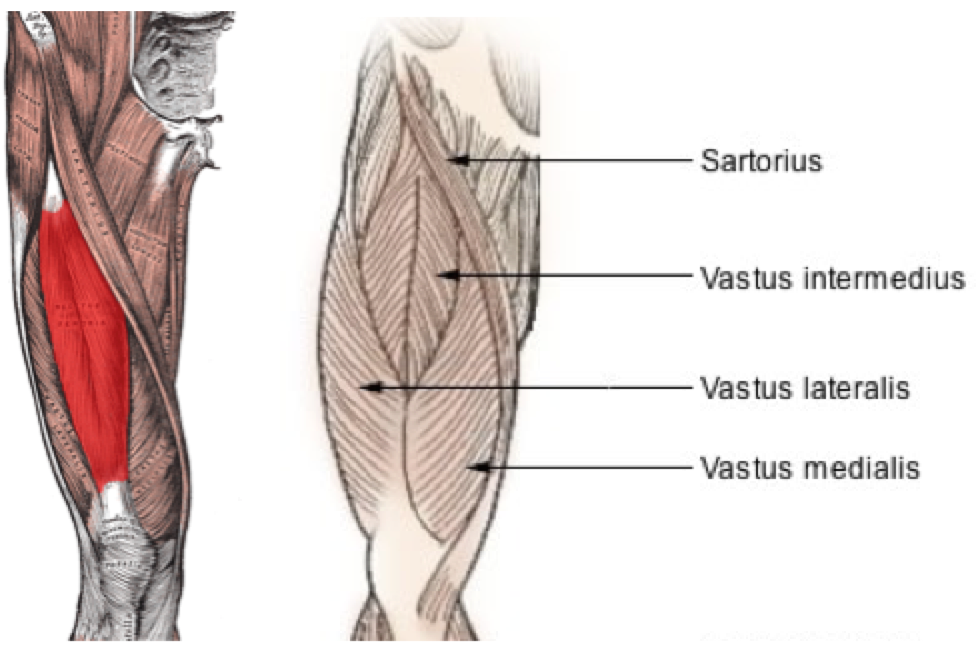
Left: Rectus Femoris (the only quad that is also a hip flexor) highlighted in red. Right: Rectus Femoris removed, showing the vastus intermedius beneath it.

If you lay your right hand on your lower right thigh so that your thumb is a few inches above your knee cap and sink your thumb into your quad, you’ll likely be right in the middle of the white area in the image above. If you slide your thumb slightly toward the middle of your thigh, you’ll roll off the edge of the rectus femoris. THIS is where you want to put the lacrosse ball as you lay your leg down on top of it (same positioning as the video above). From here, you can explore along this groove until you’re about mid-way up your thigh. With athletes that have discomfort around their knees, this can often bring a lot of relief.

[quicktime]http://www.kevinneeld.com/wp-content/uploads/2015/07/Lax-Ball-Quad.mp4[/quicktime]

Wrap-Up

Learning more specific self-soft-tissue treatments can help athletes troubleshoot issues on their own over time. These are three exercises I’ve used with a lot of our athletes that can make a big impact on how they feel and move. With all of these, discomfort is expected, but nothing should ever be painful. Start slow and progress pressure as you feel comfortable.

To your success,

Kevin Neeld
HockeyTransformation.com
OptimizingMovement.com
UltimateHockeyTraining.com

Please enter your first name and email below to sign up for my FREE Athletic Development and Hockey Training Newsletter!

Get Ultimate Hockey Transformation Now!

Year-round age-specific hockey training programs complete with a comprehensive instructional video database!

Ultimate Hockey Transformation Pro Package-small

Get access to your game-changing program now >> Ultimate Hockey Transformation

“Kevin Neeld is one of the top 5-6 strength and conditioning coaches in the ice hockey world.”
– Mike Boyle, Head S&C Coach, US Women’s Olympic Team

“…if you want to be the best, Kevin is the one you have to train with”
– Brijesh Patel, Head S&C Coach, Quinnipiac University

Part 3 of the return to normal in-season hockey training following knee surgery…

If you missed the first two posts, check them out below:

Training Hockey Players with Knee Injuries

Hockey Training with a Knee Injury

Following the first 4 weeks of training (described in the previous two posts), the player visited Shattuck St. Mary’s so he missed a week of training. When he returned, he said he’d been doing loaded, full range of motion exercises on both legs at physical therapy. His brace had been removed and he was cleared to do normal full range of motion movements, just not jump or sprint work.

I was told he had two more weeks of physical therapy, then he’d probably need another month before he’s able to return to full speed running, cutting, jumping, and skating.

Phase 3 (Weeks 5-7): Upper Body/Non-Operative Leg (Heavy)/Operative Leg (Light)
Program Goals:

  • Improve upper body strength and power
  • Improve core strength and power
  • Improve strength/coordination of the non-operative leg/hip
  • Improve single-leg stability on operative knee while minimizing compression
  • Make him work hard so he still “feels” like an athlete
  • Use exercises that won’t piss off PT or surgeon

A sample training session would look like:

A1) 1-Leg Squat: 4 x 12/side
A2) DB Incline Chest Press: 3 x 8
A3) 4-Way Stability Ball Front Plank: 3 x (3×4)/side
A4) Scap Wall Slide: 3 x 8
B1) 1-Arm DB Row: 3 x 8/side
B2) Split Squat (Front foot on BOSU): 3 x 8/side
B3) Rice Digs: 3 x 60s
C) Lying Partner Multi-Planar Hamstring Stretch

The  major changes in this program were the addition of single-leg exercises (A1 and B2) performed on BOTH legs. He told me his balance was terrible since the injury, which is why I went with higher reps on the 1-leg squats and added the BOSU for the spit squats. He really struggled with these at first, but made a ton of progress from set to set.

Multi-planar hamstring stretch
Lastly, this player has great range of motion everywhere except in his hamstrings, so we added a long hamstring stretch emphasizing hip flexion in a neutral rotation position, in external rotation and abduction (leg going outside of hip), and in internal rotation and adduction (leg going toward opposite shoulder).

I’ve had success training hockey players with knee injuries, both in terms of improving their strength/performance and minimizing/preventing knee pain or further injury. A lot of what I know about preventing and training around knee injuries I learned from my colleague Mike Robertson. He put together an incredible resource, Bulletproof Knees, that I HIGHLY recommend to anyone with a history of knee pain/injury or currently dealing with knee pain. Bulletproof Knees details exactly how you can figure out what’s wrong with you (it may not be a knee problem causing your knee pain!) and gives you the exercises to fix it. Check it out below:

Bulletproof Knees

-Kevin Neeld

Please enter your first name and email below to sign up for my FREE Athletic Development and Hockey Training Newsletter!

The main areas this program was meant to address are:

1) Improving soft-tissue quality of the muscles in the hip and thigh

2) Improving ankle range of motion

3) Strengthening the hip external rotators and abductors

4) Using isometrics (and one dynamic exercise-the reverse lunge) to strengthen the lower body

Foam Roll Circuit: Anterolateral Hip, Quads, Lateral Thigh

1 x 30s each position on each side

Lacrosse Ball Circuit: Lateral Glute, Posterior Glute

1 x 30s each position on each side

3-Way Ankle Mobility

1 x 5 each position on each side


A1) Side Lying Hip Abduction/External Rotation Hold

Week 1: 3 x 20s hold each

Week 2: 3 x 25s hold each

Week 3: 3 x 30s hold

A2) Split Squat Iso-Hold w/ Toe Pull

Week 1: 3 x 25s each

Week 2: 3 x 30s each

Week 3: 3 x 35s each

B1) Close Stance Glute Bridge Hold w/ MiniBand

Week 1: 3 x 20s hold

Week 2: 3 x 30s hold

Week 3: 3 x 40s Hold

B2) 3-Way Squat Circuit: Knees Out, Hands Behind Head, Hands Overhead

Week 1: 3 x 10s each

Week 2: 4 x 10s each

Week 3: 4 x 10s each

C1) Lateral MiniBand Walk

Week 1: 3 x 6 steps each

Week 2: 3 x 8 each

Week 3: 3 x 10 each

C2) Reverse Lunge

Week 1: 3 x 8 each

Week 2: 3 x 8 each

Week 3: 3 x 8 each

Please enter your first name and email below to sign up for my FREE Athletic Development and Hockey Training Newsletter!

Yup-worst title ever, but it got you this far…

In light of discussing hockey and soccer related groin pain for the last couple weeks, I thought I’d give a personal example that will help illustrate how some of the things we’ve talked about come together.  I’ve had off and on knee and hip problems on the left side.  Basically, I feel extremely unstable at both joints and something just feels off.

I never had any problems with my knee until I took a horrible gravel-related spill demonstrating a double lateral bound into 5-yard sprint exercise (a great drill to teach explosive lateral movement with sharp direction changes).  That brilliant display resulted in:

Nice Knee

Knee hasn’t been the same since.  But I have a history of groin pain on that side and had inguinal hernia surgery on that side as well.  In a nutshell, even with everything I’ve learned about hip and lower abdominal injuries over the last few years, I still thought my left hip was the problem.  

Recently I started high-intensity interval training on a bike.  I found that my hip and knee felt considerably more stable and symmetrical FOLLOWING the interval training.  To give you an idea, I basically fall off the bike, and walk without a knee bend because my quads and glutes are so stiff…but my hip and knee feel better. Hmm.

I did some digging around and some strategic stretching and noticed that my right rectus femoris AND psoas are WAY tighter than the same muscles on the left side.  The psoas is also a lateral rotator of the femur.  Without going into a complex functional anatomy lesson here, basically my rectus femoris and psoas were extremely tight, which resulted in my lumbar spine (the origin of the psoas) pulling slightly to the right, my right femur maintaining a slightly laterally/externally rotated position (which was accompanied by adaptive shortening of the hip lateral/external rotators).  As a result, my left hip was in a slightly medially/internally rotated position, which affected how I walked, leading to a slight hyperextension of my left knee and noticeably asymmetrical movement.  

The Bottom Line: Right Hip Problem Resulted in Left Hip and Knee Symptoms

The fix?  Stretch the hell out of my psoas and rectus on the right side.  Strengthen/shorten my psoas on the left side.  Or, in the interest of saving time while training, do both using the exercise below.


I probably started a bit high in this video, but the idea is that you strengthen/shorten your psoas by maintaining a hip flexion position above 90 degrees, while actively squeezing your glutes on the down side, which facilitates a stretch on your hip flexors.  Better/faster results comes with more time/attention paid to the problem, but if you’re in a time jam, this is a great “bang for your buck” exercise.  

Keep working smart…

Please enter your first name and email below to sign up for my FREE Athletic Development and Hockey Training Newsletter!

In Part 1, Mike told us about how he got to where he is today, how his athletic history affects his programming, and how he continues to educate himself to stay at the top of the industry.  Read on to hear Mike talk about the importance of networking, the merging of strength and conditioning and physical therapy practices, and some tips on keeping your knees healthy.

KN: How important do you think it is to network with other professionals within (other strength coaches) and outside (athletic trainers, physical therapists, doctors, etc.) our profession?  How did you go about building a team of professionals you can consult with and trust?

MR: It’s hugely important, Kevin.  Quite simply, you can’t be everything to everyone.

I’ve done my best to build a solid-network here in Indianapolis.  In fact, I had worked with at least 10 massage therapists before I found one that I was comfortable referring people to!  After three years I finally have the team I want around me – a solid PT, chiro, massage therapist, surgeon, etc.

As far as building a team goes, I really feel like you need to seek out the best in each respective field.  For me, I went to numerous massage therapists before I found one I liked.  However, doing some research could save you some time as well.  Ask around – who is really good?  Who is doing things similar to you, albeit in a different field?  It takes some time and dedication, but it will make you much more efficient in the long-run.

One last point – always remember that your network is a reflection on you as a coach.  If you refer a client to someone and they are late to appointments, or flat out not that good, it’s a poor reflection on you.  In contrast if you have solid professionals backing you, it takes your game to the next level.

KN: In the last several years there seems to be a merging of information between the strength and conditioning and physical therapy fields.  Do you think this will continue in the future?  What changes do you think will occur (or do you hope to see) in our profession over the next 5-10 years?

MR: I definitely would like to see a continued “blending” off all training mediums.  I hate the fact that people want to make the fields black and white – the PT does therapy, and then they hand the client off to the strength coach, etc.  The more each cog in the wheel understands about the others job, the more seamless the entire training process becomes.

I don’t have any desire to do true physical therapy, but having a greater understanding of their vantage point and methodologies allows me to take my job as a trainer or coach to the next level.

KN: I couldn’t agree more.  It’s a shame that the body’s functions are typically taught and viewed as isolated systems.  I think the more we can blend information among fields and open the lines of communication, the more effective all professionals will be.

It wouldn’t be a Mike Robertson interview if I didn’t ask for some knee tips.  What are three things athletes and lifters should do (and probably aren’t) to improve the health and functioning of their knees?

MR: Unfortunately, like runners and other avid enthusiasts, true lifters tend to be minimalists.  They don’t like to do the stuff that keeps them healthy; they just want to lift!

With that being said, for the average lifter here are three things I would highly recommend.  My apologies if you’ve heard this before!

#1 – Single Leg Work

Whether you’re a powerlifter, Olympic lifter, or just someone who loves to train, single-leg work does a ton of good things for your body.  It reinforces good mobility at the hips.  It improves stability in the frontal and transverse planes.  Basically, even if it doesn’t get you immeasurably stronger they can help keep your lower body healthy, especially the knees.

#2 – Foam Rolling/Mobility Drills

This has been harped on time and again, but I’m still shocked at how many people don’t warm-up, cool-down and recover properly!  Basic foam rolling and mobility drills for the hips, thighs and ankles goes a long way to staying healthy.

#3 – Get the posterior chain stronger

Again, this is harped on from an athletic perspective, but most people in general who hit the iron would be behooved to get their back side stronger.  We already know that athletes who tear their ACL’s tend to be quad dominant, and they are supposed to be “healthier” than the average individual!  Smart training for the glutes and hamstrings balances strength around the hip and knee joints, which is never a bad thing.

KN: Last question.  Knowing what you know now, would you do anything different during your college years?  What advice would you give to an aspiring strength and conditioning professional?

MR: I do my best not to look back – there are always things we wish were different!  However, our past, both good and bad, are what make us the people we are today.

I think the only thing I can honestly say I would’ve done differently was laid a better foundation up front with regards to my movement.  I know so much more now about how the body moves and functions, I feel like I could be even stronger and healthier had I laid that foundation initially.  However, I’m not doing too bad now so there’s really no need to nitpick!

To an aspiring strength coach, I would give the following advice:

Learn everything you can from everyone you can.  Some will be good, some will be bad, but soak it all up.

If you’re going to be really successful in the industry, you have to lay your own foundation.  The better you understand functional anatomy, the better off you’ll be.  Functional anatomy can help you prevent injuries, get stronger, improve athletic performance, the works.  Make it a goal to learn anatomy inside and out and never stop learning.

Finally, you are your best guinea pig.  You absolutely must push yourself in the gym if you want your clients/athletes to respect you.  You don’t have to win bodybuilding shows or powerlifting meets, but if you aren’t working hard yourself, why should your clients or athletes listen to you?

KN: Great advice!  Thanks again for taking the time to do this.  As I’ve mentioned to you before, I think Building the Efficient Athlete (Mike Robertson and Eric Cressey) and the 2008 Indianapolis Performance Enhancement Seminar (Mike Robertson and Bill Hartman) DVDs are must-sees for anyone in the industry.  Where can readers go to find out more information about these and some of your products and services?

MR: No worries Kevin – I’m glad you liked it!

The best place to track me down is at my website, www.RobertsonTrainingSystems.com.  There you can find my blog, my articles, and of course my products.  I’m actually in the process of getting the site re-designed (again), and I think you’ll really like the new look and feel I’m bringing to the table.  Basically, I just want the design to be on par with the content I feel like I’m bringing to the table!

Again, thanks for having me Kevin and I hope you all enjoyed the interview!
Kevin Neeld, BSc, MS, CSCS is the Director of Athletic Development at Endeavor Fitness in Sewell, NJ and the author of Hockey Training University’s “Off-Ice Performance Training Course,” a must-have resource for every hockey program.  Through the application of functional anatomy, biomechanics, and neural control, Kevin specializes in guiding hockey players to optimal health and performance. Kevin developed an incredible ice hockey training membership site packed full of training programs, exercise videos, and articles specific to hockey. For a FREE copy of “Strong Hockey Core Training”, one of the sessions from his course, go to his hockey training website.

Please enter your first name and email below to sign up for my FREE Athletic Development and Hockey Training Newsletter!