The preceding two articles discussed the various limitations to range of motion, and the 8 key factors influencing sport performance, respectively. If you missed them, you can check them out here:

  1. Understanding Range of Motion: More is not better
  2. Dissecting Performance Limitations

Today’s article will build on these by presenting a few simple strategies to assessing and monitoring key performance factors. As a quick review, these 8 major factors were:

  1. Genetic Capacity
  2. Movement Capacity
  3. Physical Capacities
  4. Technical Skill
  5. Tactical Abilities
  6. Fuel State
  7. Psychology
  8. Readiness

You can further bucket these concepts by their modifiability and whose responsibility it is to assess and modify them:

  1. Nonmodifiable: Genetic capacity (although if you eat, live, and train like garbage your epigenetics will express the worst version of you possible…so this can be negatively modified I suppose)
  2. Sport Coach Modifiable: Technical Skill, Tactical Abilities
  3. Support Staff Modifiable: Movement Capacity, Physical Capacities, Fuel State, Psychology, Readiness

Because of the positions I work in (Director of Performance at Endeavor Sports Performance, Strength and Conditioning Coach/Manual Therapist for the Philadelphia Flyers Junior Team and Assistant S&C Coach with the US Women’s National Team), I tend to focus on those that fall within the “Support Staff Modifiable” column, as these are the ones I have the ability to influence. Below is a list of assessments that can be used for each of these categories:

Movement Capacity: Selective Functional Movement Assessment (SFMA), Functional Movement Screen, Postural Restoration Institute (PRI) tests, Y-Balance Test, traditional orthopedic assessments for range of motion (We use seated hip rotation, lying shoulder rotation at 90° abduction, FABER, Quadruped Rock, Craig’s Test, and Seated T-Spine Rotation). Within these options, SFMA is most appropriate for an individual in pain, whereas the FMS is more suitable for individuals not in pain to get a basic assessment of movement quality. I believe PRI has value within both of these circumstances. The traditional orthopedic tests mentioned above are largely encompassed with the SFMA “breakouts”.
Functional Movement Systems
An outstanding tool to get a quick glimpse of how people move and to pre-qualify them for certain exercises.

Physical Capacities: Vertical Jump, Broad Jump, Lateral Bound, Multiple-Jump Tests, Olympic Lifting Variation 1-3 RMs, Major Lift 1-10+ RMs, Continuous Conditioning Tests (e.g. 12-Minute, 6-Minute or 2-Minute Run, Bike or Swim), Intermittent Conditioning Tests (Yo-Yo Intermittent Recovery Tests, Beep Tests, Repeat Shuttle Tests, etc.), and Cardiac Parameters (General: Resting Heart Rate, Heart Rate Variability; During the Test: Average Heart Rate, Maximum Heart Rate, 60s Heart Rate Recovery).

Fuel State: This is tougher to measure without blood, urine, and/or saliva tests, but a 3-Day Food Log will give you a pretty good indication of what the athletes are eating on a regular basis.

Psychology: I’m sure there are a lot of these out here, but I like the “Grit Scale” questionnaire from Angela Duckworth at UPenn.
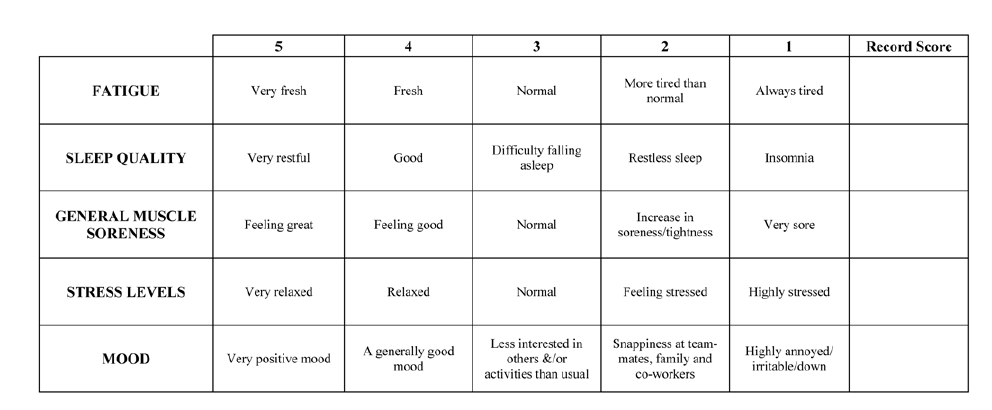
Readiness: Resting Heart Rate, HRV, Daily Recovery Questionnaires (See Below), Perceived Exertion Questionnaires, OmegaWave.

Subjective Questionnaire

This is a great questionnaire stemming from the research of McClean & Coutts (International Journal of Sports Physiology and Performance, 2010) that Patrick Ward introduced me to. There are plenty of others, including the “Profile of Mood States”, that have some merit.

We don’t use all of these at Endeavor, primarily because we don’t have the budget for certain pieces of technology and/or because some of these assessments are redundant. I don’t think it’s necessary to perform the world’s most comprehensive testing battery with every athlete. I do, however, think it’s worth the time and effort to do enough that you can identify outliers and red flags.

Wrapping Up
One of my inspirations for writing this series stems from several conversations I’ve had with athletes and coaches over the last few weeks about why they (or their athletes) aren’t able to perform up to some desirable standard. Sometimes the answer lies in not possessing the necessary movement or physical capacities, in which case there is likely a training solution. Often times there are underlying nutrition/lifestyle causes for droughts in performance or a failure to maintain a high level of play consistently throughout a single event or across multiple events within a fairly short amount of time (e.g. a week or weekend). Insufficient or inappropriate fueling, for example, can mask itself as poor conditioning. Poor sleep quality can mask itself as “overtraining”.

The big take home message here is that if you don’t have some means of assessing these buckets, you don’t really have a way to identify whether someone is trending in a positive or negative direction for any of the individual factors. It can be easy to identify decreasing performance, but the goal is never to just point out when someone is playing poorly; it’s to make targeted adjustments to help get them back on track. Utilizing a few basic assessments can provide extremely valuable information to identify the primary factors contributing to performance plateaus or decreases, and therefore provide a foundation for making the necessary changes to improve performance moving forward.

To your success,

Kevin Neeld
OptimizingMovement.com
UltimateHockeyTraining.com

Please enter your first name and email below to sign up for my FREE Athletic Development and Hockey Training Newsletter!

Get Ultimate Hockey Training Now!

“…an extremely rare comprehensive look at the present state of ice hockey training.”
“…a must-have for coaches and strength professionals at all levels of hockey.”
Ultimate Hockey Training

Part 1 of the “Optimal Movement Series” discussed several reasons why it’s so important to have an assessment process in place and identified a few ways in which structural changes will influence movement. If you missed that, you can check it out here: Structural Adaptations: Not Just a Hockey Problem

Today we’ll continue the discussion by delving into the topic of corrective exercise, what it means and when it’s appropriate to use.

The Truth About Corrective Exercise

I first started hearing the term “corrective exercise” about 7 years ago. Typically, it’s used within the context of basic mobility exercises or lower level stability exercises thought to help restore balance in mobility and stability across joints and improve “awareness” to ultimately improve movement quality. The general rationale here was to take exercises used in the rehabilitation of certain injuries, and integrate them into training programs in a pre-emptive effort to help minimize the risk of these injuries ever occurring. This made sense to me then, and still makes sense to me now, to an extent.

One thing that has become more clear to me as I’ve had opportunities to attend FMS, PRI, and DNS courses, among others, is that in order for something to be truly “corrective”, there needs to be some sort of test or “audit”. In other words, if you’re telling someone to do an exercise to “correct” something, how do you know if it’s working? Thinking in this way has really changed the way I think about the entire training process (as I’ll discuss more in a future piece).

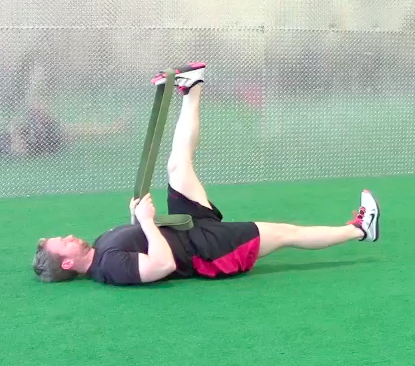
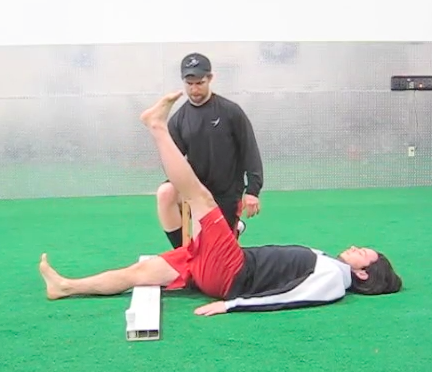
As an example, if you’re familiar with the FMS Active Straight Leg Raise test, you know that the test is scored as a 3, 2, or 1 depending on how high the individual can raise his/her leg while maintaining the specified alignment or a “0” if the individual has pain. These zones are separated by measuring the distance between the ASIS of the hip and the mid-patella, and then marking half of that distance (roughly the mid thigh). Anything above the midpoint is a “3”, anything between the midpoint and the mid-patella is a “2”, and anything below the mid-patella is a “1”. If it’s painful, it’s a “0”.  As a general rule, the desired goal here is to get “2’s” on both sides.

Active Straight Leg Raise

Active Straight Leg Raise

 If, for example, someone had a “1’s” on both sides, and you integrated a Supported Single-Leg Lowering exercise into their program as a means of helping them achieve 2’s on both sides, this could appropriately be called a “corrective exercise”. You have a test, and you’re programming a specific exercise to improve a quality that you can then assess the effectiveness of by retesting.

Band-Supported Single-Leg Lowering

Band-Supported Single-Leg Lowering

 As another example, I’ve seen a good number of people that have a limited Adduction Drop Test (see video below) on the left, that also have less Active Straight Leg Raise motion on the left compared to the right. This is likely because of the position of their pelvis, which is oriented to the right and forwardly tipped on the left, placing the left hamstring complex under tension.

PRI Pelvis

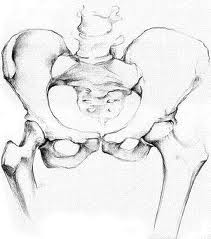
A picture taken from PRI illustrating the pelvic position most humans gravitate towards

 In this situation, a Left Adductor Pullback may be sufficient to reorient the pelvis to a more neutral position, which would then clear the Adduction Drop Test AND the discrepancy in Active Straight Leg Raise.

 These examples highlight two situations where exercises are being used to correct a pattern. Importantly, the goal here is to now integrate the newly acquired function (be it mobility, stability or both in nature) into more “functional” or capacity-based exercise. For example, once we’ve established a reasonable amount of symmetry within an Active Straight Leg Raise pattern, we have a green light to progress to double- and single-leg loaded hip hinge variations (e.g. trap bar deadlifts, 1-leg stiff-legged deadlifts, etc.), and if appropriate for the individual’s training goals, more explosive movements within this pattern, such as broad jumps, kettlebell swings, hang cleans, etc.  These are just a few examples; obviously there are other factors that need to be accounted for in exercise selection, but the idea is to progress beyond corrective work.

This idea of Assess -> Correct -> Reasses has a different end-goal, in most cases, than integrating exercises like glute bridges, miniband walks, front planks, etc. into programs. The latter can be considered more “activation” in nature, or really simply fall into the broader bucket of what I think of as core training. If you call any miniband walk a corrective exercise, the follow up question should be “corrective for what?” There may be an answer for that, depending on the athlete. Athletes that are well trained and have established a quality squat, deadlift, and single-leg patterns may do mini-band walks with the intent of activating the lateral hip musculature almost within the same context as a warm-up. In contrast, an athlete whose knees touch while squatting may benefit from the neuromuscular cuing that the band provides to engage the glutes and lateral hip musculature to maintain better alignment during the movement. One is warm-up; one is corrective.

The reality is that in most cases the goal is to do as little true “corrective” work as possible, and quickly progress to training that will enhance physical capacities (e.g. speed, power, strength, conditioning, etc.). In many instances, depending on the dysfunction, I think it should be a quick journey to individual-specific full training clearance. The waters get a little muddier when programming is attempting to counteract positions the athlete/client spends time in outside of the training facility.

It’s for this reason that I don’t think it’s a bad idea to continue incorporating exercises designed to be corrective on an ongoing basis. For example, having a guy that sits hunched over in front of a computer all day do a couple sets of glute bridges and thoracic spine rotations is unlikely to hurt, and very likely to help. If they continue to pass your reassessment, the exercises can be viewed as reinforcement, warm-up, activation, neuromuscular cuing, etc. If they aren’t passing the reassessment, then you have to consider (among other things):

  1. Does the corrective exercise actually work for THAT individual?
  2. Do you need to discuss alternative strategies for the positions/postures that individual spends the majority of their time in away from you?
  3. Do you accept that you may never “win” the corrective battle for a given individual, but continue to program specific corrective work in an attempt to “minimize the bad, and maximize the good”?

In the last year, I’ve heard a few people “in the industry” with whom I have a lot of respect dismiss the term “corrective exercise”, and I completely get it. Corrective exercise is being thrown around a lot, often to simply refer to low-level activation exercises, which may not be correcting anything. There are two major problems with this:

  1. If there is too large of a disconnect between corrective exercise and the individual’s functional activities, the correctives won’t stick.
  2. Some people in training professions get so caught up in trying to correct everything that they forget their job is to improve physical capacities.

As an example of both, sometimes range of motion is restricted as a protective mechanism if the individual doesn’t possess the stability/control or strength to own that range. In these (and many other) circumstances, strength training with traditional exercises may be the most corrective thing the person can do.

The important take homes here are that corrective exercise needs to be programmed to correct something, and there should be a way to assess whether it’s working or not. Corrective work doesn’t always need to be in the form of low level activation exercises, and not every low level activation exercise needs to be programmed with a corrective intent. As with every exercise in your program, you should ask yourself, “Why am I programming this exercise, and is it producing the intended results?”

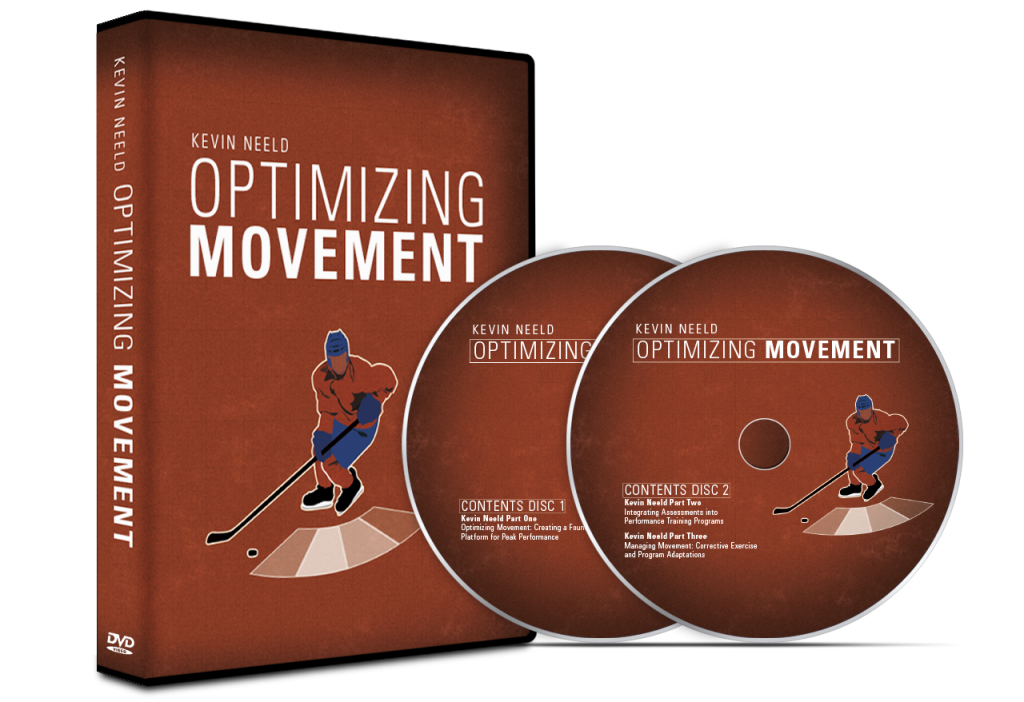
In a couple days, I’ll be back with the third part of this series, “Individualizing Corrective Exercise and Movement in a Group Setting”. In the meantime, don’t forget to check out the Optimizing Movement DVD set, which you can get for a $20 discount until next Saturday (December 7th), as part of a special “Extended Black Friday Sale”. Click the link below for more information!

Get Optimizing Movement Now!

“…one of the best DVDs I’ve ever watched”
“A must for anyone interested in coaching and performance!”

Optimizing Movement DVD Package

Click here for more information >> Optimizing Movement

To your success,

Kevin Neeld
OptimizingMovement.com
UltimateHockeyTraining.com

Please enter your first name and email below to sign up for my FREE Athletic Development and Hockey Training Newsletter!

My new DVD set Optimizing Movement was released several months ago and I continue to get outstanding feedback from a wide range of professionals throughout the training and rehabilitation spectrum.

Optimizing Movement DVD Package
Today I wanted to share a review that Kevin Miller, Fitness Coach for the Philadelphia Union Major League Soccer Team, recently sent me. This is a neat review because it shows how this information not only impacts his athletes, but also his own health/performance. It also highlights the fact that there are underlying patterns that affect all movement, regardless of sport, and that these need to be addressed in order to get the most out of more sport-specific work. Enjoy!

Kevin Miller
“I recently purchased a copy of Optimizing Movement by Kevin Neeld. As a coach I am always looking for ways to reduce injuries as well as improve the performance of the athletes and clients that I work with. As an athlete myself I want to make sure that I am staying up with the latest research to improve my performance as well.

When I heard that Kevin was coming out with a product I had no doubt that what he was planning to offer would be a quality product. With new products coming out every day it’s hard to decide what products will actually offer value. I have followed Kevin over the past few years so I was confident that this product would offer tremendous value.

One of the main reasons I purchased the DVD was I wanted to see how Kevin and his staff set up their training system and specially their assessment and corrective exercise philosophy. Having taken a PRI course, I wanted to know what is the best way to implement these strategies into a group training environment.  The DVD is broken down into three parts, which I’ve described below with a few of my own thoughts.

Part 1 Key Topics

  1. Goals of training
  2. Movement is a big piece of reducing injuries
  3. Athletic Performance Pyramid
  4. Foundations of Optimal Movement
  5. Explains joint neutrality and basic overview of PRI
  6. Importance  of the diaphragm in performance
  7. Provides excellent pictures of athletes that present with problems
  8. Overview of FAI
  9. Provides his assessment for FAI
  10. Discusses regional interdependence
  11. Joint by Joint

Part 2 Key Topics

  1. Talks about his assessments
  2. Does a really good job of explaining some of the PRI tests
  3. This section was really good because he has videos for all of his assessments and does a really good job of explaining each test

Part 3 Key Topics

  1. Talks about how to manage movement and how he sets up his corrective exercise strategy
  2. Provides the four places he puts corrective exercise
  3. Provides video for LAIC problems and solutions for people that present with this pattern

Overall this product is excellent. Having taken a Myokinematic Restoration course from PRI this product has really helped my understand how to implement what I was able to learn in the two day course and integrate it into a team setting.  The information that I was able to learn in this DVD will help me tremendously with the professional soccer players as well as the weekend warriors that I work with on a daily basis.

From a personal standpoint I am a classic LAIC pattern in the PRI world. So for me I took a lot of the information that I was able to learn in this product and I have started to implement these strategies into my own training and I can honestly say that I feel better. Over the years I have suffered several nagging injuries on my left side and I really had no solution as to why this was happening. Foam rolling and stretching was not cutting it. With the addition of some  simple changes and a better understanding of why I may have had these injuries I expect to reduce the number of injuries in the future while improving my performance in the weight room as well as on the track.

In summary, I would definitely recommend this product. I have spent much more on products that were not worth the shipping costs. This product is high quality and Kevin provides valuable information to the coaches in the sports performance field.”

Kevin Miller
Philadelphia Union Fitness Coach

 Optimizing Movement Cover-Small

Get your copy now! >> Optimizing Movement

To your success,

Kevin Neeld
OptimizingMovement.com
UltimateHockeyTraining.com

Please enter your first name and email below to sign up for my FREE Athletic Development and Hockey Training Newsletter!

Being a strength coach and a manual therapist has given me a different perspective on how important it truly is to assess athletes for structural and functional limitations and address them before they become serious injuries and surgeries. Exercises that revolve around optimizing breathing patterns have become a big piece of that equation for me over the last few years. Despite being a “soft” training modality, these strategies can have a significant impact on sport performance. Below are 5 major ways that breathing can affect sport.

1) Improving Joint Range of Motion
Different activities require different ranges of motion (obviously), and different sports have different joints that tend to get looked at more than others. For example, the idea of a shoulder internal rotation deficit in baseball pitchers has received a lot of attention over the last decade, which lead to the popularization of the “sleeper stretch” to help improve IR. Interestingly, you can lay the athlete down on the floor, teach them to engage their left abdominal wall to help pull their ribs down while they cycle a few breaths in through their nose and out their mouth and right shoulder IR will improve tremendously (often times 15-30 degrees). A similar approach can be used to restore hip adduction and symmetry in hip rotation range of motion. The question then becomes “do these athletes need to stretch?” Simply, if you can get the desirable range of motion in 30s of breathing, then you probably don’t need to stretch. The range of motion was limited because of the position of the pelvis and thorax, NOT because of a limitation in the shoulder. Using specific breathing exercises can restore neutrality to the pelvis and thorax allowing the expression of the available range of motion.

[quicktime]http://www.kevinneeld.com/wp-content/uploads/2013/10/PRI-All-Four-Right-AIC-Respiratory-Crawl.mp4[/quicktime]
This is a breathing exercise from the Postural Restoration Institute that I use a lot to elicit rapid changes in shoulder and hip range of motion.
2) More optimal movement patterns
When an athlete starts in a non-neutral position, their range of motion will be limited in predictable ways. This is an idea I’ve talked about a lot in the past (See: Managing Structural and Functional Asymmetries in Ice Hockey: Part 1 and Part 2). Attempting to perform any sporting movement that passes through the positional end range limit will lead to a compensatory pattern. It’s interesting to work with athletes that are aware of these compensations. For example, I recently spoke to a pro baseball pitcher who said he felt like his hips hit a certain point during his delivery where they’d shift to the side, which was limiting his power. Not surprisingly, our assessment found he lacked IR on that front leg, meaning he would hit end range and then shift laterally as a strategy to still deliver the ball to the plate. Using breathing-driven exercises to help restore neutrality frees up range of motion (as mentioned above), which can then be incorporated into functional movements. This is one of the reasons I often tell skill coaches that my job is to make their life easier!

3) Decreased injury risk
Injuries are a tricky thing. There is a lot that goes into what predisposes an athlete to specific injuries and what strategies should be targeted to help decrease his or her risk. That said, muscles that are poorly positioned to do their job, fatigue, and poor recovery are three factors that are hard to ignore. The latter two will be discussed next, so I’ll just address the first. As I’ve alluded to above, positional breathing can help restore the pelvis to a neutral position and therefore unlock range of motion and restore the surrounding muscles to a more optimal position to do their jobs. By tying in specific exercises with respiration, you’re able to groove a better motor pattern and help reinforce more optimal function. As an example, a lot of athletes suffer from left groin pain secondary to being in a position of  flexion/abduction/external rotation and either attempting to push further into abduction/external rotation and/or attempting to use a long, neurologically weak adductor group. This position also leads to a descending anterior pelvic floor and ascended posterior pelvic floor. In other words, the anterior pelvic floor is in an “inhalation” position, and the posterior pelvic floor is in an “exhalation” position. Using an exercise like the Right Side Lying Left Adductor Pulback below allows the athlete to restore their pelvis to a neutral position, and engage their left adductors in a shorted position to help restore motor control in this range. By pulling the femur back on the inhale, the athlete can also “open up” their posterior hip capsule, helping to shift this into more of an inhalation state. By pulling the left knee down into the right leg upon exhalation, the athlete can “close down” their anterior pelvic floor, helping to shift this into more of an exhalation state, ultimately improving the ability of the pelvis to move reciprocally from a neutral position during the various phases of respiration.

[quicktime]http://www.kevinneeld.com/wp-content/uploads/2013/10/PRI-Right-Side-Lying-Left-Adductor-Pullback.mp4[/quicktime]
4) Delaying fatigue through changes in pH
pH is a significant factor in dictating the efficacy of muscle contraction. During high intensity activity, when the demands of the activity cannot be fully met by aerobic metabolism, pH levels lower as hydrogen ions accumulate as a byproduct of glycolytic metabolism. With this in mind, utilizing optimal breathing patterns, while still activity appropriate (as I mentioned here: Chest Breathing vs. Belly Breathing), can help maximize air exchange and therefore either delay the point at which metabolism changes to primary anaerobic processes and/or help facilitate a more rapid restoration following a high intensity effort.

Admittedly, making the leap that stationary breathing exercises will improve sport conditioning is confounded by a lot of factors. That said, I always come back to the idea that if an athlete does not possess the positioning, mobility, core control, and diaphragm power to hit a few sets of quality breaths in a somewhat static, relatively quiet environment, it’s extremely unlikely they’ll be able to do so while in competition. In other words, by removing the confounding factors we have a more realistic window to assess and train a pattern, as we do with all aspects of human performance that is then available to the individual to utilize in their sport.

5) Shifting into a parasympathetic state quickly following activity
I get a lot of questions about how I incorporate PRI or breathing exercises into a team setting. One of the methods that we use breathing for is to help elicit a shift toward a more parasympathetic state following training sessions and sometimes following practices if I’m at the rink.  Hyperinflation is associated with a more sympathetic state, so providing an opportunity for the athletes to lay down, exhale fully, and inhale calmly can quickly shift them more parasympathetically. This also highlights why optimizing breathing patterns can have a profound impact on everyday life; if we’re living life in a constant state of unwarranted sympathetic tone because of the breathing stereotype we use, we’re tapping into a lot of “fight or flight” resources that could be better utilized when we actually need them. This idea of facilitating a faster recovery is one of the main selling points I use in a team setting. More specifically, I let our athletes know that it will help them fall asleep faster at night. In hockey, as I suspect in many sports, a lot of games finish fairly late and players are amped up afterward. Despite getting home at 10-11pm, many won’t fall asleep until after 1. Using this strategy has helped a lot of our players “dim the lights”, so to speak, both physically and mentally and fall asleep faster.

Despite these concepts being presented separately, they are all very interrelated. All of the body’s systems influence one another. Simply, breathing exercises can be used to improve range of motion, joint stability, air exchange, and recovery from training. As a strength and conditioning coach, these are all things that can positively influence the athletes and clients we work with, which is why breathing exercises have become a mainstay in our programs.

To your success,

Kevin Neeld
OptimizingMovement.com
UltimateHockeyTraining.com

P.S. If you’re interested in understanding how position can influence respiration, range of motion, injury patterns, and the training process, check out my new DVD set Optimizing Movement, which has received rave reviews from professionals in rehabilitation and training settings!

Optimizing Movement DVD Package

Please enter your first name and email below to sign up for my FREE Athletic Development and Hockey Training Newsletter!

When I first started learning about breathing, it was within the context of “chest breathing is bad, belly breathing is good.” The short explanation for this thought process is that belly breathing is driven by the diaphragm, whereas chest breathing is driven by “accessory” respiration muscles and ultimately leads to dysfunction and/or pain. This explanation seemed to make sense and was simple enough to observe with our athletes, so I didn’t feel a strong pull to dig deeper into this relationship.

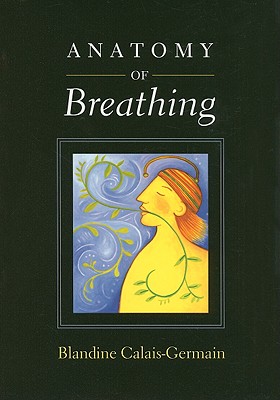
Around this time, I came across a book titled “Anatomy of Breathing” by Blandine Calais-Germain, which was recommended as a simple, but comprehensive description of breathing anatomy. This was my first introduction to the concept that there are different zones within the thorax that need to expand with inhalation and a limitation in any of them would warrant specific breathing strategies to correct it.

 Anatomy of Breathing

I really enjoyed this book: Anatomy of Breathing

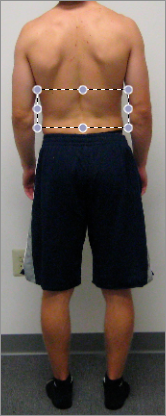
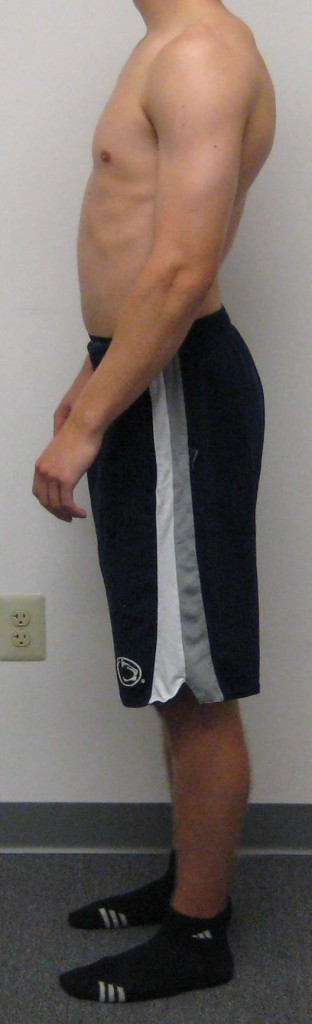
For example, you can imagine that, with the degree of extension this gentleman presents with, it will be difficult for him to get any posterior expansion upon inhalation on either side. This would be a “zone” to concentrate progressively feeding more air into to drive a more optimal breathing pattern.

 PEC Posture

This outlook of finding and addressing restricted zones immediately conflicts with “chest breathing bad, belly breathing good” thought process. 5 years and 144 hours of PRI courses later, it is more clear than ever that there is a lot more to the story than desiring chest or belly breathing. The reality is that we want diaphragm driven breathing with the opportunity for reciprocal chest wall expansion, which ultimately stems from appropriate pelvic and thorax/rib positioning and mobility, and surrounding muscular control. To help illustrate this point, consider the following example.

An individual in an extended state (as in the picture above) has two primary options to get air in upon inhalation. He/she can lift the rib cage vertically using “accessory” respiratory muscles, such as the scalenes, upper traps, and pec minor, or pull further into extension and allow the abdominal contents to bulge forward. This latter scenario is the outcome of many people attempting belly breathing and is as dysfunctional as any “chest breathing” pattern.

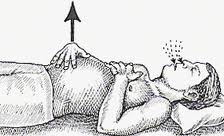
Belly Breathing

A quick search with google images uncovered this guy from breatheeasymassage.wordpress.com. This may be a useful strategy in raising the individual’s awareness regarding where their air is going, but this is NOT an optimal breathing strategy.

While symptoms can arise in a number of places from a dysfunctional breathing pattern, it’s easy to imagine how using muscles around the neck and shoulders to elevate a stiff rib cage could lead to neck/shoulder pain, and how driving from excessive extension to even more extension could result in back pain, especially with the abdominals becoming dystonic as a result of being attached to an anteriorly tipped pelvis and anteriorly flared rib cage, and having to bulge further outward.

 PEC-Side View

Can you envision how driving a “belly breath” from this position would pull him further into extension?

I think the people that understand breathing the best understand what an optimal “belly breath” looks like, but what has trickled down to the layperson is that “more belly expansion is better”, which is a far cry from optimal respiration. Lurking in the background of this discussion is the idea that the pattern should fit the need for respiration. On one end of the spectrum, during times of complete inactivity (think sleeping), quiet breathing may result in a mild circumferential expansion of the lower ribs and abdomen (different than the abdominal wall just protruding forward) with very little chest expansion. In contrast, during high intensity activity, using accessory respiratory muscles is desirable to maximize air exchange. There’s a reason why they’re accessory! Naturally, the goal is always to train to create an environment where this “emergency” point is delayed as long as possible. The areas in between these two extremes should be characterized by a synchronous expansion of the abdominal and chest cavities. The greater the need for air exchange, the greater the degree of expansion in both areas. One at the expense of the other can be viewed as dysfunctional.

Hopefully this discussion helps shed some light on the limitations of the belly breathing vs. chest breathing thought process. Because the overwhelming majority of the athletes and clients we see present in an over-extended state, lying down in this extended state and driving air through their belly will, in fact, be counterproductive and further lock in their dysfunctional pattern. It’s important that we first correct POSITION before addressing the respiratory pattern, as the diaphragm (the target respiration muscle) cannot function optimally unless it is positioned to do so. If you’re interested in this topic, I’d encourage you to read the two articles below, which dig a little deeper into how to achieve more optimal diaphragmatic positioning and how it influences function.

  1. Zone of Apposition
  2. The Value of Blowing Up A Balloon

To your success,

Kevin Neeld
OptimizingMovement.com
UltimateHockeyTraining.com

P.S. If you’re interested in understanding how position can influence respiration, range of motion, injury patterns, and the training process, check out my new DVD set Optimizing Movement, which has received rave reviews from professionals in rehabilitation and training settings!

Optimizing Movement DVD Package

Please enter your first name and email below to sign up for my FREE Athletic Development and Hockey Training Newsletter!